Code the grid based inventory system

There are many different styles of inventory systems and in this tutorial series you will learn how to create a grid-based system that requires the player to sort items by size to carry as many as possible. This part of the series builds on the design from part 1 by instantiating a visual to represent items held and adding the ability to organize them. On the surface, this logic seems simple – just drag/drop. However, scenarios that prevent an item from being placed make the logic more complicated.
Note: This tutorial is a continuation of the grid inventory system that was started in Part 1, Design the Grid Based Inventory System. Download the starter project from GitHub, which comes equipped with the designed UI, to skip ahead.
Learning Outcomes
This tutorial will cover the basics of interacting with UI Toolkit from C# and populating it with data from a ScriptableObject. By the end, you will know how to:
- Define and create scriptable object assets to represent items in an inventory
- Create a Visual Element and set various properties via C#
- Hook up mouse/pointer click and move events to implement drag/drop behavior
- Check for overlapping Visual Elements
- Set a Visual Elements position at runtime based on the mouse
Prerequisites
- You should have Unity 2021.1.12f1 or later to follow along with this tutorial.
- This tutorial assumes you have basic knowledge of Unity and C#.
This tutorial will work with earlier versions of Unity but has a higher chance of having UI Toolkit related bugs and may have different installation requirements. Check out the UI Builder release notes for more information on compatible versions.
Resources
This tutorial uses two resources from the community:
Getting Started
There are a couple of simple actions that you will need to do to prepare your project for this part of the series. The steps will depend on if you have skipped or completed part 1, Design the Grid Based Inventory System.
Skipping
If you are skipping part 1 of the series, then you will need the Inventory UI UXML to work from. Download the starter project from the GameDev Resources GitHub repository. The starter project also comes equipped with the new dependencies, UniTask and 2D Sci-Fi Weapons Pack.
Completed
If you completed the first part then you will need to install two community packages in your project – UniTask and 2D Sci-Fi Weapons Pack. UniTask is available on GitHub. Go to the releases tab and download the Unity package to import it in. The 2D Sci-Fi Weapons Pack is on the Unity Asset Store and can be imported through the usual workflow.
Create the data
You will use Scriptable Objects to manage the items in the game. If you are not familiar, ScriptableObjects are a simple way to manage data in your game. You can also build UI windows on top of them to create a streamlined experience. Check out Create an item management editor window with UI Toolkit for a deeper look.
To create a scriptable object, add a new C# script called ItemDefinition and add the following code:
using System;
using UnityEngine;

[CreateAssetMenu(fileName ="New Item", menuName ="Data/Item")]
public class ItemDefinition : ScriptableObject
{
    public string ID = Guid.NewGuid().ToString();
    public string FriendlyName;
    public string Description;
    public int SellPrice;
    public Sprite Icon;
    public Dimensions SlotDimension;
}

[Serializable]
public struct Dimensions
{
    public int Height;
    public int Width;
}
ItemDefinition has the usual suspects of an item – name, description, sell price, and icon. It also has a Dimensions struct, which defines the number of height and width slots the item should take up on the inventory UI. Every item should, at a minimum, have a width and a height of 1.
Add the items
Create four different items, which will be added to the inventory on game launch. Here’s how:
- Create a new folder called Data.
- Right click on the Data folder and go to Create > Data > Item.
Note: Create > Data > Item is the path that was set in theCreateAssetMenu attribute of ItemDefinition.
Name it Flamethrower and set the following properties:
- Friendly Name: Flamethrower
- Description: A level 5 Flamethrower that packs quite the punch.
- Sell Price: 50
- Icon: blaster\_purple
- Slot Dimension > Height: 1
- Slot Dimension \> Width: 2
Add three more Items into the data folder using the steps above but with the following properties:
- Friendly Name: Light Ammo
- Description: Light Ammo that can be used with a handgun.
- Sell Price: 5
- Icon: ammo\_purple
- Slot Dimension > Height & Width: 1
- Friendly Name: Medkit
- Description: A medium medkit that heals for 100 health.
- Sell Price: 100
- Icon: med\_iso\_green
- Slot Dimension > Height & Width: 1
- Friendly Name: Handgun
- Description: A level 1 handgun that fires energy bullets.
- Sell Price: 10
- Icon: gun\_red
- Slot Dimension > Height & Width: 1
Create the VisualElement item
Every item in the inventory needs to have an VisualElement generated. When working with UI Toolkit you always have the option to build your VisualElements in C#, which is exactly what you will do right now. Before jumping in though, it’s helpful to understand that the visual representation will be made up of two VisualElements – a parent and a child:

As you can see, the parent handles most of the styling and will also handle the click events later. The only purpose of the child is to display the icon. Create a new script called ItemVisual and add the following:
using UnityEngine;
using UnityEngine.UIElements;

public class ItemVisual : VisualElement
{
    private readonly ItemDefinition m_Item;

    public ItemVisual(ItemDefinition item)
    {
        m_Item = item;

        name = $"{m_Item.FriendlyName}";
        style.height = m_Item.SlotDimension.Height *
            PlayerInventory.SlotDimension.Height;
        style.width = m_Item.SlotDimension.Width *
            PlayerInventory.SlotDimension.Width;
        style.visibility = Visibility.Hidden;

        VisualElement icon = new VisualElement
        {
            style = { backgroundImage = m_Item.Icon.texture }
        };
        Add(icon);

        icon.AddToClassList("visual-icon");
        AddToClassList("visual-icon-container");
    }

    public void SetPosition(Vector2 pos)
    {
        style.left = pos.x;
        style.top = pos.y;
    }
}- Lines 12-17 are setting the properties of the root VisualElement (the parent in the reference above). The height and width are set based on the slot dimensions (from the asset you created earlier) and the height/width value of an empty slot. The visibility is set to hidden to prevent the player from seeing the item move positions. It’s turned on later, which makes it “appear” in the spot it’s supposed to be.
- Lines 19-23 are creating a new child VisualElement called Icon and setting the background image to the same one set in the
ItemDefinitionasset you created earlier. TheAdd()method is how the VisualElement is added as a child.
- Lines 25-26 are adding two new styles to the parent and children. You’ll create both of these shortly.
- Line 29 is creating a new
SetPosition()method, which is howPlayerInventorywill change the position of it later.
Note: PlayerInventory is a script that you’ll create shortly which will expose the height/width of an empty slot.
Add the Styles
There are two new styles that you will need to add to the existing stylesheet. Open InventoryStyleSheet.uss and add the following:
.visual-icon-container {
    height: 100%;
    width: 100%;
    position: absolute;
    padding: 15px;
    background-color: rgb(14, 14, 14);
    border-width: 1px;
    border-color: rgb(75, 75, 75);
}

.visual-icon {
    height: 100%;
    width: 100%;
    -unity-background-scale-mode: scale-to-fit;
}
These styles are pretty straight forward. The big thing to note is that the parent container’s position is set to absolute, which lets you set the position of the VisualElement without having to balance / impact the position of the siblings.
Note: It’s recommended that you only set an element’s position to Absolute when you absolutely need it. (Couldn’t resist…) Read more about position settings with UI Toolkit here.
Create a \StoredItem\ Map
You will need a way to map two key pieces of information together – the data of the item and the VisualElement that displays it to the player. This will be used by the PlayerInventory class that you’ll create in the next section.
Create a new class called StoredItem and add the following code:
[Serializable]
public class StoredItem
{
    public ItemDefinition Details;
    public ItemVisual RootVisual;
}
Generate the Inventory
The PlayerInventory script will handle all the logic for the inventory. This includes generating the visual icon of an item that the player is holding. Create a new C# script called, you guessed it, PlayerInventory and add the following code to make it a singleton:
public sealed class PlayerInventory : MonoBehaviour
{
    public static PlayerInventory Instance;

    private void Awake()
    {
        if (Instance == null)
        {
            Instance = this;

            Configure();
        }
        else if (Instance != this)
        {
            Destroy(this);
        }
    }
}
If you are not familiar, the singleton design pattern is a way to ensure that only one instance of a class ever exists. It also gives you a direct reference to the class via the static Instance variable.
Next, add several global variables and two new methods for setup:
private VisualElement m_Root;
private VisualElement m_InventoryGrid;

private static Label m_ItemDetailHeader;
private static Label m_ItemDetailBody;
private static Label m_ItemDetailPrice;
private bool m_IsInventoryReady;
public static Dimensions SlotDimension { get; private set; }

private async void Configure()
{
    m_Root = GetComponentInChildren<UIDocument>().rootVisualElement;
    m_InventoryGrid = m_Root.Q<VisualElement>("Grid");

    VisualElement itemDetails = m_Root.Q<VisualElement>("ItemDetails");

    m_ItemDetailHeader = itemDetails.Q<Label>("Header");
    m_ItemDetailBody = itemDetails.Q<Label>("Body");
    m_ItemDetailPrice = itemDetails.Q<Label>("SellPrice");

    await UniTask.WaitForEndOfFrame();

    ConfigureSlotDimensions();

    m_IsInventoryReady = true;
}

private void ConfigureSlotDimensions()
{
    VisualElement firstSlot = m_InventoryGrid.Children().First();

    SlotDimension = new Dimensions
    {
        Width = Mathf.RoundToInt(firstSlot.worldBound.width),
        Height = Mathf.RoundToInt(firstSlot.worldBound.height)
    };
}
The point of Configure is to find all references and set any initial values needed. Specifically, here is what it’s doing:
- Line 12-19: Sets the references to key VisualElements Line 21: Pauses until the end of the frame. This gives the UI Toolkit layout engine time to calculate the positioning and size of all elements if it hasn’t.
- Line 23: Calls
ConfigureSlotDimensions(), which calculates the size of a single slot item. The calculated value was used byItemVisualin the code you added earlier.
- Line 25: Sets
m_IsInventoryReadyas true, which is a value used by the next method you’ll add – LoadInventory.
Note: UniTask is an awesome open source package that lets you create C# async methods that can take advantage of Unity message events. I have found that I tend to gravitate more towards using it over Coroutines, as my code is a lot more clean with it.
ConfigureSlotDimensions() is a pretty simple method that grabs the first child of m_InventoryGrid and sets SlotDimensions variable to the width/height of it.
Note: The WorldBound property is used a lot in this tutorial. Check out the Unity-Manual: The Visual Tree page for more information.
Load the items
Now that PlayerInventory has the right references, it’s time to load the player’s items in game. This is going to be a fair amount of code, so I’ll break it into several bite sized chunks.
Hop back over to the PlayerInventory class and add the following code:
public List<StoredItem> StoredItems = new List<StoredItem>();
public Dimensions InventoryDimensions;

private async Task<bool> GetPositionForItem(VisualElement newItem)
{
    for (int y = 0; y < InventoryDimensions.Height; y++)
    {
        for (int x = 0; x < InventoryDimensions.Width; x++)
        {
            //try position
            SetItemPosition(newItem, new Vector2(SlotDimension.Width * x,
                SlotDimension.Height * y));

            await UniTask.WaitForEndOfFrame();

            StoredItem overlappingItem = StoredItems.FirstOrDefault(s =>
                s.RootVisual != null &&
                s.RootVisual.layout.Overlaps(newItem.layout));

            //Nothing is here! Place the item.
            if (overlappingItem == null)
            {
                return true;
            }
        }
    }
    return false;
}

private static void SetItemPosition(VisualElement element, Vector2 vector)
{
    element.style.left = vector.x;
    element.style.top = vector.y;
}StoredItemsshould be fairly obvious – it is a list of the StoredItem mapping which is used throughout this class. InventoryDimensions contains the number of columns and rows that the inventory has. You’ll set this in the inspector later.
GetPositionForItem handles the logic for determining the position of an item, which is a little complicated. The code will loop through all slots – row by row and look for the first empty position. Once found, it will check the surrounding areas to make sure there’s enough empty slots based on the item width/height. If it is, it returns true and if not it continues the search. False will be returned if no space is found.
The cool part of this method is the check whether two VisualElements are overlapping each other. This is done on lines 16-18 by calling layout.Overlaps() on a VisualElement and passing in a second element. Very handy!
private void Start() => LoadInventory();

private async void LoadInventory()
{
    await UniTask.WaitUntil(() => m_IsInventoryReady);

    foreach (StoredItem loadedItem in StoredItems)
    {
        ItemVisual inventoryItemVisual = new ItemVisual(loadedItem.Details);

        AddItemToInventoryGrid(inventoryItemVisual);

        bool inventoryHasSpace = await GetPositionForItem(inventoryItemVisual);

        if (!inventoryHasSpace)
        {
            Debug.Log("No space - Cannot pick up the item");
            RemoveItemFromInventoryGrid(inventoryItemVisual);
            continue;
        }

        ConfigureInventoryItem(loadedItem, inventoryItemVisual);
    }
}

private void AddItemToInventoryGrid(VisualElement item) => m_InventoryGrid.Add(item);
private void RemoveItemFromInventoryGrid(VisualElement item) => m_InventoryGrid.Remove(item);

private static void ConfigureInventoryItem(StoredItem item, ItemVisual visual)
{
    item.RootVisual = visual;
    visual.style.visibility = Visibility.Visible;
}
LoadInventory() is doing the following:
- Lines 8: Waits until
m_IsInventoryis true before proceeding. This is a safety check to make sure everything is good to go.
- Line 12-14: Creates a new VisualElement of type ItemVisual and adds it as a child of InventoryGrid (via the method on line 31).
- Lines 16-25: Checks to see whether there’s space in the inventory for the item. If not, the VisualElement is deleted from the scene. If it is, ConfigureInventoryItem is called, which stores a reference to the UI in StoredItems and sets the Visibility so the player can see it.
That’s it for this part! Save all of the files if you haven’t and hop back over to Unity.
Test the code
Open the scene that you have the Inventory UI enabled in. It is located in WUG \> Scenes folder if you are using the starter project. Do the following:
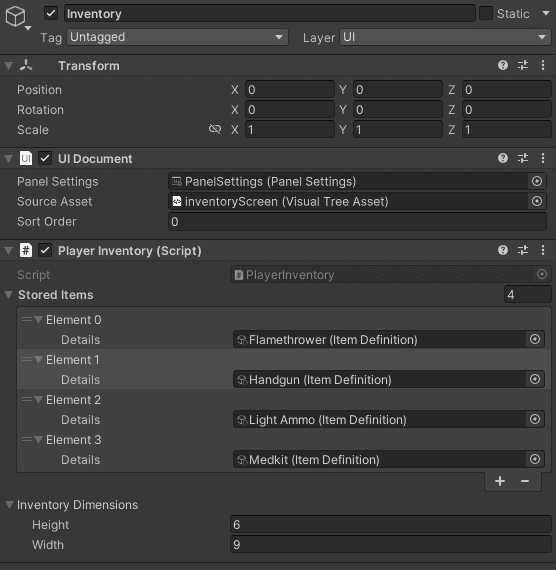
- Click on the Inventory game object and add the
PlayerInventoryscript.
- Add all of the scriptable objects in the Data folder to the StoredItems list.
- Set Inventory Dimensions to equal the amount of rows and columns the inventory slots have. In most cases, it should be a height of 6 and a width of 9.
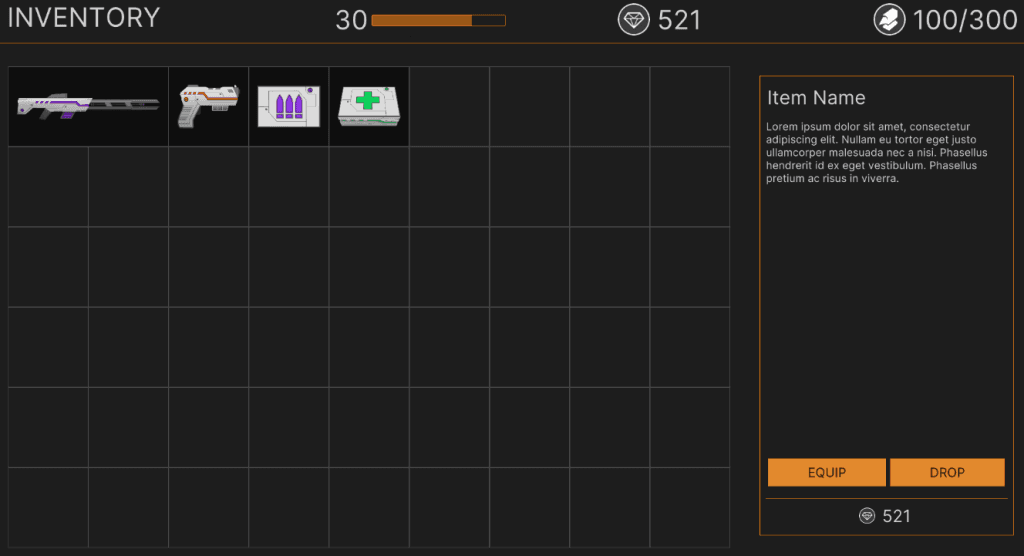
Push play and you should see all of the items load.
Create the Telegraph
When moving an item it’s helpful for the player to know where exactly they are aiming it. To show this, you’ll add a telegraph to the scene which will highlight the relevant nodes with a light yellow border, like below.
Add a new global variable and method the PlayerInventory class:
private VisualElement m_Telegraph;

private void ConfigureInventoryTelegraph()
{
    m_Telegraph = new VisualElement
    {
        name = "Telegraph",
        style =
        {
            position = Position.Absolute,
            visibility = Visibility.Hidden
        }
    };

    m_Telegraph.AddToClassList("slot-icon-highlighted");
    AddItemToInventoryGrid(m_Telegraph);
}
When called, ConfigureInventoryTelegraph will instantiate a new VisualElement with the proper name and add as a child to m_InventoryGrid. It’ll also add the relevant style properties by calling AddToClassList.
Open InventoryStyles.uss and to create the new style class:
.slot-icon-highlighted {
    border-width: 1px;
    border-color: rgb(202, 158, 0);
    transform-origin: center;
    position: absolute;
    visibility: hidden;
}
One final change is to call ConfigureInventoryTelegraph() in the Configure() method. Put the following code before you wait for the end of the frame:
ConfigureInventoryTelegraph();Unfortunately, you can’t test this quite yet because you need the ability to move an item! That’s up next.
Add Interactions
Loading the items is great, but the player is going to need to organize things. The ItemVisual class will handle all of the logic for registering, unregistering and processing click events. There’s going to be two events that you will monitor for:
- Mouse Up occurs when the player releases the mouse button.
- Mouse Move is called when the mouse is moved.
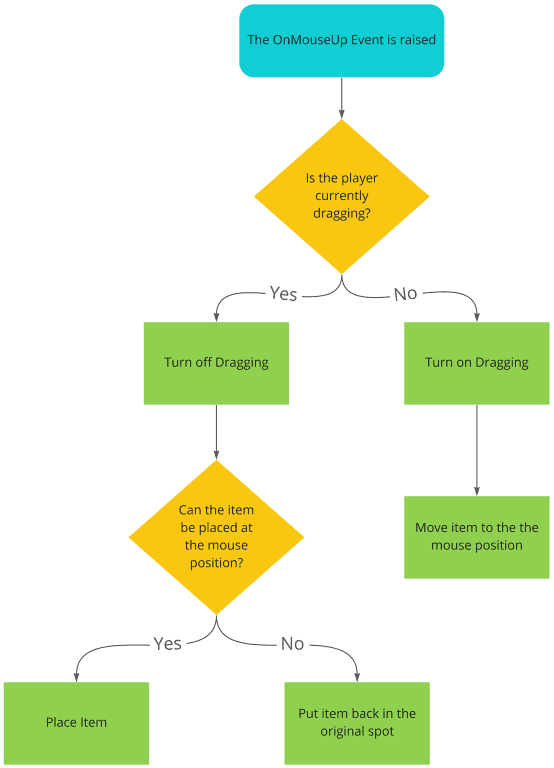
Handle OnMouseUp
The decision flow for the OnMouseUp event looks like this:
Hop over to ItemVisual class and the following new global variables and methods:
private Vector2 m_OriginalPosition;
private bool m_IsDragging;
private (bool canPlace, Vector2 position) m_PlacementResults;

private void OnMouseUpEvent(MouseUpEvent mouseEvent)
{
    if (!m_IsDragging)
    {
        StartDrag();
        return;
    }

    m_IsDragging = false;

    if (m_PlacementResults.canPlace)
    {
        SetPosition(new Vector2(
            m_PlacementResults.position.x - parent.worldBound.position.x,
            m_PlacementResults.position.y - parent.worldBound.position.y));
        return;
    }

    SetPosition(new Vector2(m_OriginalPosition.x, m_OriginalPosition.y));
}

public void StartDrag()
{
    m_IsDragging = true;

    m_OriginalPosition = worldBound.position - parent.worldBound.position;
    BringToFront();
}
As you saw in the diagram – Lines 3-7 are checking to see if the player is currently dragging an item and if not, it initiates the drag via StartDrag() and bails out of the rest of the method. The rest of the code (lines 9+) handles the scenario of the player stopping the drag by:
- Line 9: Sets m\_IsDragging to false so that the OnMouseMoveEvent stops evaluating. (You’ll see this in a moment.)
- Lines 11-17: Confirms if the item being dragged is allowed to be placed in the spot the player released the mouse. If so, it sets the new position of the visual element and aborts the rest of the method.
- Line 19: Resets the item to the original position.
The StartDrag method does the following after toggling m_IsDragging on:
- Line 26: Calculates the original position by subtracting the elements worldBound position from the parents.WorldBound position.
- Line 28: Moves the visual element to the front, which makes it appear above everything.
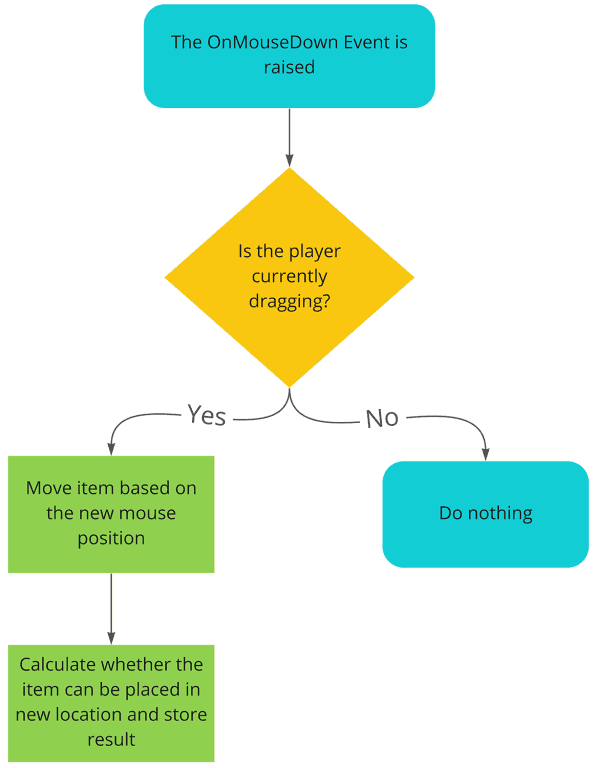
Handle OnMouseMove
The decision flow for OnMouseMove is more more simple:
Add the following methods to the ItemVisualclass:
private void OnMouseMoveEvent(MouseMoveEvent mouseEvent)
{
    if (!m_IsDragging) { return; }

    SetPosition(GetMousePosition(mouseEvent.mousePosition));
    m_PlacementResults = PlayerInventory.Instance.ShowPlacementTarget(this);
}

public Vector2 GetMousePosition(Vector2 mousePosition) =>
    new Vector2(mousePosition.x - (layout.width / 2) -
    parent.worldBound.position.x, mousePosition.y - (layout.height / 2) -
    parent.worldBound.position.y);
As the diagram shows, OnMouseMoveEvent detects if the player is currently dragging and if so, it’ll move the item. It’ll then calculate whether the item can be placed by calling PlayerInventory.Instance.ShowPlacementTarget(this).
ShowPlacementTarget doesn’t exist though, so save the file and open PlayerInventory to add the final method:
public (bool canPlace, Vector2 position) ShowPlacementTarget(ItemVisual draggedItem)
{
    if (!m_InventoryGrid.layout.Contains(new Vector2(draggedItem.localBound.xMax,
        draggedItem.localBound.yMax)))
    {
        m_Telegraph.style.visibility = Visibility.Hidden;
        return (canPlace: false, position: Vector2.zero);
    }

    VisualElement targetSlot = m_InventoryGrid.Children().Where(x =>
        x.layout.Overlaps(draggedItem.layout) && x != draggedItem).OrderBy(x =>
        Vector2.Distance(x.worldBound.position,
        draggedItem.worldBound.position)).First();

    m_Telegraph.style.width = draggedItem.style.width;
    m_Telegraph.style.height = draggedItem.style.height;

    SetItemPosition(m_Telegraph, new Vector2(targetSlot.layout.position.x,
        targetSlot.layout.position.y));

    m_Telegraph.style.visibility = Visibility.Visible;

    var overlappingItems = StoredItems.Where(x => x.RootVisual != null &&
        x.RootVisual.layout.Overlaps(m_Telegraph.layout)).ToArray();

    if (overlappingItems.Length > 1)
    {
        m_Telegraph.style.visibility = Visibility.Hidden;
        return (canPlace: false, position: Vector2.zero);
    }

    return (canPlace: true, targetSlot.worldBound.position);

}
This one is a little bit complicated because it needs to also check whether the item is hanging off of the edge of the inventory zone. The method returns two key pieces of data – whether the item can be placed and the target position.
Here’s more specifically what is happening:
- Lines 3-7: Checks to see whether the dragged item is hanging over the edge and if so, skips drawing the telegraph and instead returns false and Vector2.zero.
- Lines 10-13: Finds the closest inventory grid slot relative to the dragged item by checking for all overlapping elements and sorting by distance.
- Lines 15-16: Set the width and height of the telegraph based on the dragged item
- Lines 18-20: Set the position of the telegraph and change toggles the visibility to on.
- Lines 23-30: Check whether the target location of the dragged item is overlapping any other ItemVisuals, and if so returns false and Vector2.zero.
- Line 32: All checks have passed, so the method returns true and the target position.
Ideally, you’d probably want to extend this logic so that it swaps an overlapping item, rather then rejecting the intention altogether. The complexity comes with detecting whether the dragged item is overlapping more then one of the items. If it is, then you probably want to skip the swap.
Register/Unregister the events
One last thing to do before you can test this! Add the following two pieces of code to the end of the constructor:
~ItemVisual()
{
    UnregisterCallback<MouseMoveEvent>(OnMouseMoveEvent);
    UnregisterCallback<MouseUpEvent>(OnMouseUpEvent);
}
Next, add a way to unregister the events with a deconstructor:
~ItemVisual()
{
    UnregisterCallback<MouseMoveEvent>(OnMouseMoveEvent);
    UnregisterCallback<MouseUpEvent>(OnMouseUpEvent);
}
Note: Learn more about mouse events here.
Alright! That was a lot of work. Now’s the time to see if it paid off. Save everything and push play in Unity. You should be able to move the item around, see the telegraph appear and place it as long as it is not overlapping another.
Display the item details
One last thing to do and then you’re all done! Item metadata needs to be displayed on the right panel when the item is clicked. The code to do this is pretty simple.
Go to PlayerInventory and add the following method:
public static void UpdateItemDetails(ItemDefinition item)
{
    m_ItemDetailHeader.text = item.FriendlyName;
    m_ItemDetailBody.text = item.Description;
    m_ItemDetailPrice.text = item.SellPrice.ToString();
}
Next, go back to ItemVisual and edit the OnMouseUpEvent so that the first if statement calls the following code:
PlayerInventory.UpdateItemDetails(m_Item);That’s it! Run the game in Unity and click on any item in the inventory. You should see the details appear.