Point to click movement with the new Input System & Cinemachine
There are a lot of different types of movements that can be implemented in a game. Point to click is often times popular for strategy games, some RPGs, and many adventure games. In this tutorial you’ll move a single character around the scene based on where the player clicks their mouse, having them dodge obstacles and alternate between two types of movements; walking and running. A Cinemachine virtual camera will be used to automatically keep the player in focus while they move around the level.
Learning Objectives
You’ll learn many concepts, such as how to:
- Use a Cinemachine virtual camera to automatically follow the player
- Configure and hook into the new input system
- Setup and use the navigation system
- Rotate towards a direction before moving
Prerequisites
- You will need Unity 2021.3 LTS or later to follow along.
- This tutorial assumes you already have basic knowledge of Unity and intermediate knowledge of C#.
Getting Started
This tutorial builds on top of a demo scene that is included in the starter project. You can download the starter project by:
- Clone and/or download the GitHub repository.
- Navigate to the point-to-click-with-new-input-system\\projects\\gdr-point-click-starter folder in Unity.
You will see several folders folders in Assets/GDR. The project comes with a Demo scene, scripts, models, animations, sprites, textures, and materials. You’ll use assets from the Materials folder throughout the tutorial. The rest is included for the demo scene, which is where you will work in. Open the scene by navigating to Assets/GDR/Scenes/Demo.
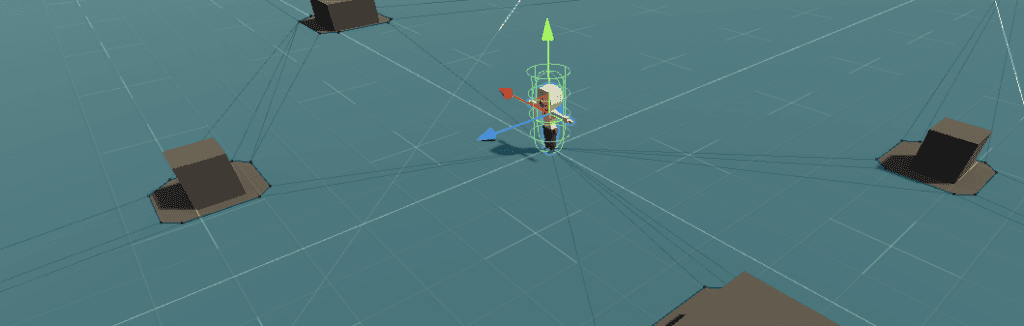
The demo scene comes with the foundation of the project already setup. In it, you should see a ground with some boxes that will be obstacles for later. The player’s character already has animations setup for idle, walking, and running. You’ll access these animations via the AnimationController class later in the tutorial.
Configure Cinemachine
Note: Cinemachine features are included in a separate package which is already included in the starter project.
Cinemachine is a very powerful set of tools that let you do smart, dynamic camera handling without having to write code. For this project, you’ll use Cinemachine to setup a virtual camera that will always keep the player in frame. This eliminates the need to create a custom camera rig that is a child of the player or write custom code.
Cinamechine works by having one or more virtual cameras that the real camera can move between. In this case, you’ll have just one camera setup above the character at an angle. Add a new Virtual Camera by going to GameObject \> Cinemachine > Virtual Camera. Set the following properties:
- Name: Cam\_TopDown
- Position: {x: 0, y: 7.6; z:-6.5}
- Rotation: {x: 50, y: 0; z:0}
- Follow: Player
- Lens \> Lens Vertical FOV: 50
- Lens \> Near Clip Plane: 0.1
- Lens \> Far Clip Plane: 100
- Body: Framing Transposer
- Aim: Do Nothing
Finally, you’ll need to add a Cinemachine Brain component to the main camera. This creates a link between all of the virtual camera’s and the real camera.
Try moving the player around the scene manually and you should notice the camera follow along all on it’s own.
Configure the Input System
Note: Input System features are included in a separate package which is already included in the starter project.
The “new” Input System is quite different compared to the native input system as it is far more robust and feature rich. The version that you’ll setup in this project will be very simple – it will only listen for and route left mouse button clicks and the windows ‘shift’ button. Here’s what each players input will correspond with:
- Single Left Mouse: Walk
- Double Left Mouse: Run
Create an Input Action asset
The Input Action asset contains a mapping between input actions and their Bindings and Control Schemes. Bindings are specific device input(s) to monitor for, such as a trigger on a gamepad, a mouse button or key on the keyboard. Control schemes are a way to specify device requirements that must be met for an input binding to be usable. They are optional and can be left alone (zero requirements).
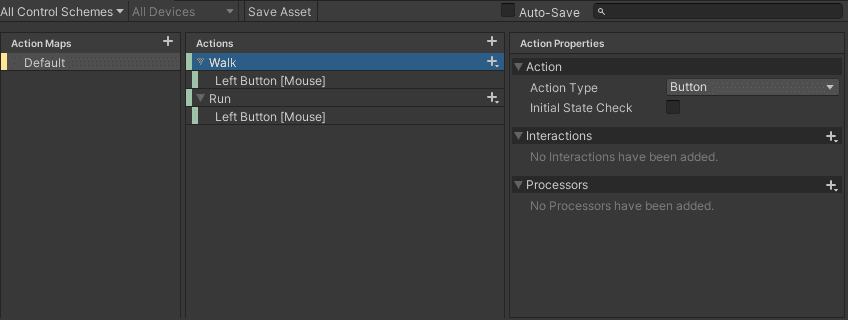
Right click in the Project window and go to Create \> Input Actions to create a new asset. Name it InputControls. Open the asset and click the \+ button to add a new Action Map. Name it Default. In the actions section, select the first one, which is added by default, and rename it to Walk. Set the binding property to Left Button \[Mouse\]. Add one more action with the following properties:
- Name: Run
- Binding Properties \> Binding: Left Button \[Mouse\]
Your Input Action asset should now look like this:
I know what you must be thinking, “These are the same! Stupid tutorial… This must be a typo!” Fear not, my friend. You’ll add an interaction to the Run action to ensure that it is only triggered if the player double clicks. With the Run binding selected, click the + button next to Interactions and select Multi Tap. Set the following properties:
- Tap Count: 2
- Max Tap Spacing: 0.25
- Max Tap Duration: 0.5
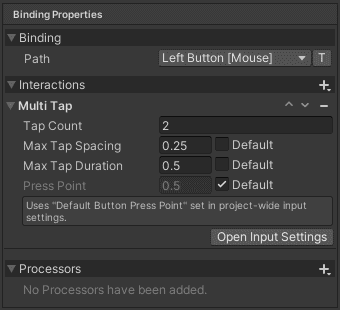
An Interaction represents a specific input pattern that the player must perform for an event to be triggered. The multi tap interaction requires the user to press and release two times, thus double clicking the mouse, in order to trigger this event. Max Tap Spacing is the maximum delay (in seconds) allowed between each tap. Max Tap Duration is the time (in seconds) that a control has to be released again for it to register as a tap. The interaction is canceled if the player exceeds the time on either of these.
Click Save Asset to store all of your settings and close the window.
Route the events via code
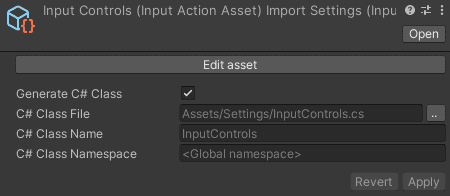
There are several different ways that you can hook events up to the Input System. My favorite is to do it via code. However, before you can jump into writing code you will need to generate the C# classes. Select the Input Actions asset, check the Generate C# Class box, and click Apply.
Next, create a new C# class called PlayerMovementController. Add the following code:
public class PlayerMovementController : MonoBehaviour
{
    private InputControls _inputMapping;

    private void Awake() => _inputMapping = new InputControls();

    void Start() {
        _inputMapping.Default.Walk.performed += Walk;
        _inputMapping.Default.Run.performed += Run;
    }

    private void OnEnable() => _inputMapping.Enable();

    private void OnDisable() => _inputMapping.Disable();

    private void Run(CallbackContext context) {
        Debug.Log("Run");
    }

    private void Walk(CallbackContext context) {
        Debug.Log("Walk");
    }
}
The code above creates a new instance of InputControls, which was generated in the previous step. Start registers three callback methods, which run when each of the actions are considered performed.
Note: There are five types of InputActionPhase events that you can hook into. They are Canceled, Disabled, Performed, Started and Waiting. You can read more about each of the states here.
Head over to Unity and push play. Try single clicking, double clicking, and pushing the shift button. You should see all of the Debug Logs show up.
Setup the navigation system
The first movement that you will officially hook up is the ability to walk. You will use the navigation system to find an acceptable place for the player to move to.
First, select the Player game object and add the NavMeshAgent component. Set the following properties:
- Steering \> Speed: 2.5
- Obstacle Avoidance \> Height: 2
All objects must be marked static in order for them to be baked. Click on the Ground game object and check the Static checkbox. Next, select all of the Obstacles and add a new NavMeshObstacle component. Make sure to mark them Static as well.
Open the Navigation tab by going to Window \> AI \> Navigation. Click on the Bake tab and select the Bake button. In the scene view, you should now see the ground covered in blue, minus a little carved area around the obstacle boxes.
Rotate the player
The player must rotate to face the direction that they are going to walk before they can start walking. This will be done in three steps:
- First, the input must be detected for a single left click. (You already hooked this up!)
- Next, a raycast is used to find the closest place the player can walk in world space.
- Finally, if a location is detected, then the player will rotate to face the direction.
Add the following code to PlayerMovementController:
private Camera _camera;
private NavMeshAgent _agent;
private float _rotateSpeed = 5f;
private bool _needToRotate = false;

private Vector3 _moveTarget = Vector3.zero;
private Vector3 _direction = Vector3.zero;
private Quaternion _lookRotation = Quaternion.identity;

void Start() {
    //original code above this point

    _camera = Camera.main;
    _agent = GetComponent<NavMeshAgent>();
}

private void Update() {
    if (_needToRotate) {
        transform.rotation = Quaternion.Slerp(transform.rotation,
             _lookRotation, Time.deltaTime * _rotateSpeed);

        if (Vector3.Dot(_direction, transform.forward) >= 0.97) {
            _needToRotate = false;
        }
    }
}

private void Walk(CallbackContext context) {

    Ray ray = _camera.ScreenPointToRay(Mouse.current.position.ReadValue());

    if (Physics.Raycast(ray, out RaycastHit hit, 50f)) {
        if (NavMesh.SamplePosition(hit.point, out NavMeshHit navPos, .25f, 1 << 0)) {
            _moveTarget = navPos.position;
            _direction = (_moveTarget.WithNewY(0) - transform.position).normalized;
            _lookRotation = Quaternion.LookRotation(_direction);
            _needToRotate = true;
        }
    }
}
Vector3.Dot is a handy method for checking whether two things are facing the same direction. It will return 1 if they point in exactly the same direction, -1 if they point in completely opposite directions and zero if they are perpendicular.
Push play and click around the scene. You should see the player rotate around to face the direction you’ve clicked.

Make the player walk
Wonderful! Now it’s time to move the player to the location they’re facing, but only after they have finished rotating. Update your code with the following:
public float _walkSpeed = 2.5f;
public float _runSpeed = 4f;

private MovementStates _currentMovement;
public MovementStates CurrentMovement
{
    get => _currentMovement;
    set
    {
        switch (value)
        {
            case MovementStates.Walk:
                _agent.speed = 2.5f;
                AnimationController.Instance.CurrentState = MovementStates.Walk;
                break;
            case MovementStates.Run:
                _agent.speed = 4f;
                AnimationController.Instance.CurrentState = MovementStates.Run;
                break;
            case MovementStates.None:
                AnimationController.Instance.CurrentState = MovementStates.None;
                break;
        }

        _currentMovement = value;
    }
}

private void StopNavigation() {
    _agent.SetDestination(transform.position);
    CurrentMovement = MovementStates.None;
    AnimationController.Instance.CurrentState = CurrentMovement;
}
Here is what the code above is doing:
- CurrentMovement tracks the current movement of the character. It also handles setting NavMeshAgent.speed, which dictates how fast the agent should move.
StopNavigationstops the navigation system by setting the destination to where the player is currently located. It also disables the movement animation that is currently playing.
Next, refactor both Update and Walk and add a new public variable:
public bool IsNavigating => _agent.pathPending || _agent.remainingDistance > .25f;

private void Update() {
    if (!_needToRotate && !IsNavigating && _currentMovement != MovementStates.None) {
        StopNavigation();
    }
    else if (_needToRotate) {
        transform.rotation = Quaternion.Slerp(transform.rotation,
             _lookRotation, Time.deltaTime * _rotateSpeed);

        if (Vector3.Dot(_direction, transform.forward) >= .99f) {
           _agent.SetDestination(_moveTarget);
           AnimationController.Instance.CurrentState = CurrentMovement;
            _needToRotate = false;
        }
    }
}

private void Walk(CallbackContext context) {
    Ray ray = _camera.ScreenPointToRay(Mouse.current.position.ReadValue());

    if (Physics.Raycast(ray, out RaycastHit hit, 50f)) {
        if (NavMesh.SamplePosition(hit.point, out NavMeshHit navPos, .25f, 1 << 0)) {

            _moveTarget = navPos.position;
            _direction = (_moveTarget.WithNewY(transform.position.y) -
                transform.position).normalized;
            _lookRotation = Quaternion.LookRotation(_direction, Vector3.up);
            _needToRotate = true;

            StopNavigation();

            CurrentMovement = MovementStates.Walk;

            if (IsNavigating && Vector3.Dot(_direction, transform.forward) >= 0.25f) {
                _agent.SetDestination(_moveTarget);
            }
        }
    }
}
Update will now check whether the player has arrived at their destination and if so, stop the navigation. Walk will skip stopping the navigation and rotating if the player is facing enough of the same direction as the new click. This will create a more smooth experience when changing direction.
Push play and move the player around. You should now have a smooth navigation.
Make the player run
Making the player run is as easy as adding two lines of code to the Run method. Update your code so that it has the following:
private void Run(CallbackContext context)
{
    CurrentMovement = MovementStates.Run;
    AnimationController.Instance.CurrentState = CurrentMovement;
}
Every time you double click, the single click input will run. This means that you can always rely on Walk() to do the calculation of where the player needs to go. Since Run() will execute second, all it needs to do is ensure the speed and animation state are correct.
Press play and try alternating between single and double clicks in the scene. You should see your character moving as expected.

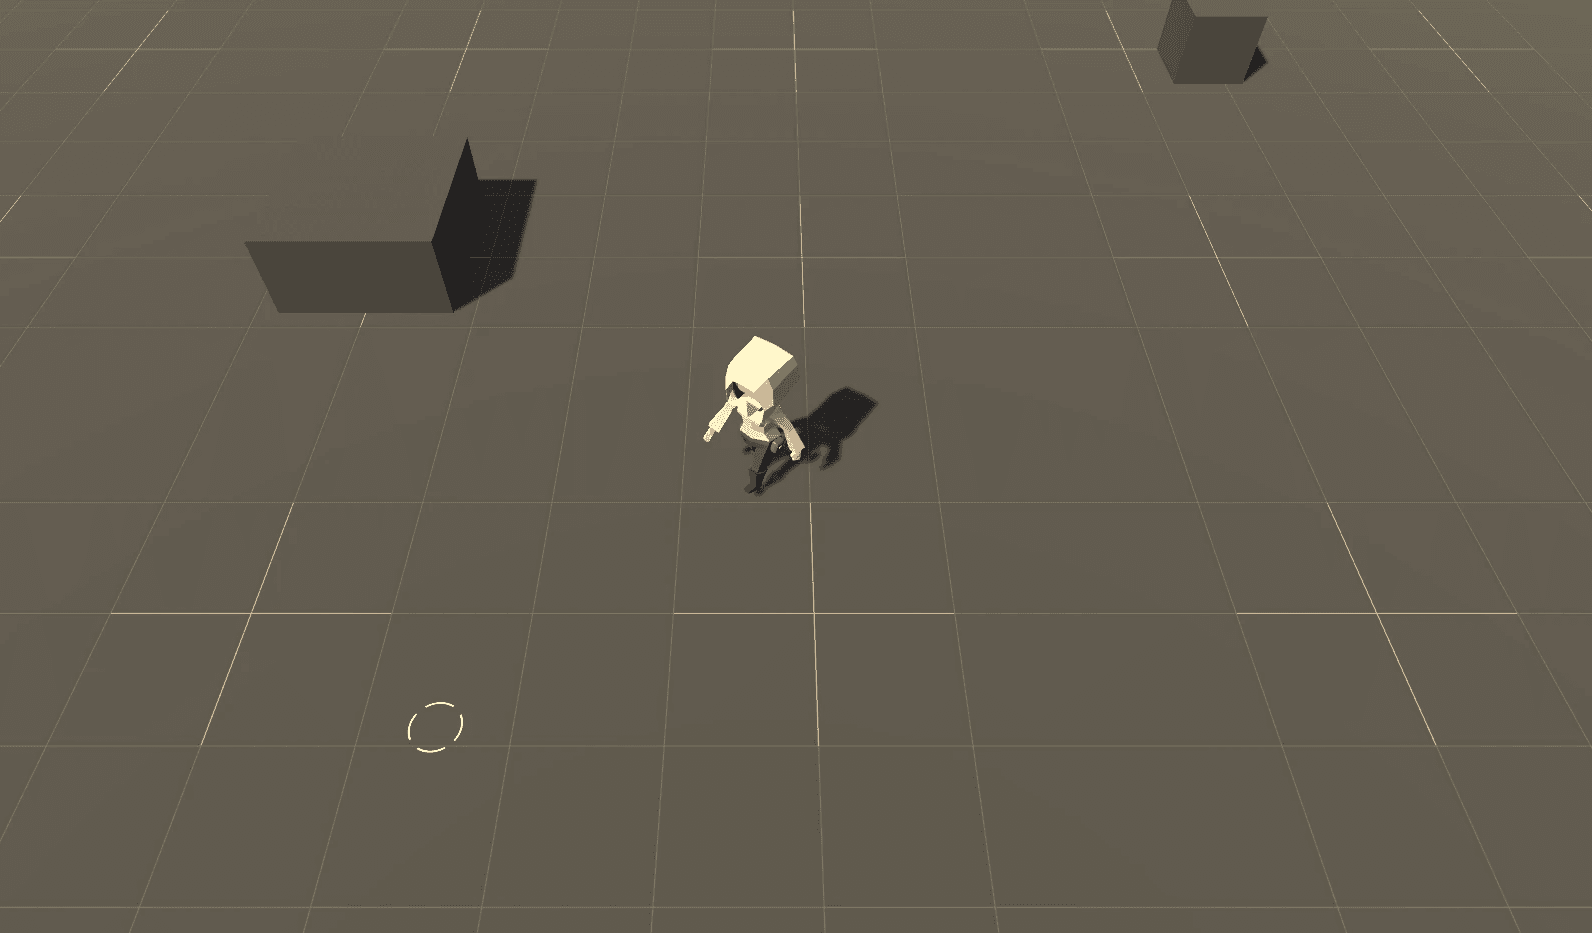
Show a ‘click position’ decal
The last little bit of polish that you’ll add to this project is an animated circle that appears where the player clicked as a way to confirm the location.
Create a new game object called MovementIndicator. Set the transform to {x: 0, y: 0.1, z: 0}. Add a Particle System component and set the following properties:
- Looping: False
- Start Lifetime: 0.5
- Play on Awake: False
- Max Particles: 1
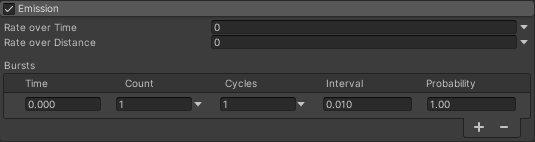
Enable Emission and set Rate Over Time to 0. Add one burst with the following properties:
- Time: 0
- Count: 1
- Cycles: 1
- Interval: 0.010
- Probability: 1
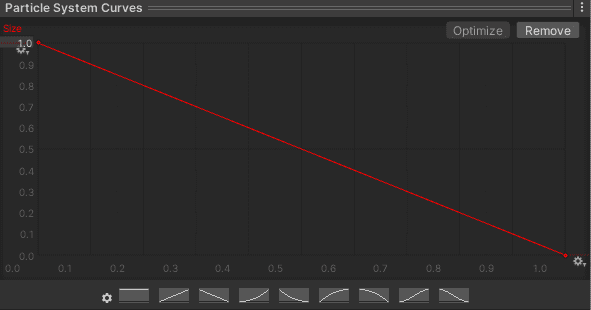
Disable Shape if it’s turned on. Enable Size over Lifetime and flip the curve so that it starts off large and goes small, like so:
Finally, under Renderer set the following properties:
- Renderer Mode: Mesh
- Meshes: Quad
- Material: Walk Decal
- Renderer Alignment: Local
Open PlayerMoevementController and add a new global variable and two lines of code to Walk():
public ParticleSystem WalkDecal;

private void Walk(CallbackContext context) {

    Ray ray = _camera.ScreenPointToRay(Mouse.current.position.ReadValue());

    if (Physics.Raycast(ray, out RaycastHit hit, 50f)) {
        if (NavMesh.SamplePosition(hit.point, out NavMeshHit navPos, .25f, 1 << 0)) {
            _moveTarget = navPos.position;

            WalkDecal.transform.position = _moveTarget.WithNewY(0.1f);
            WalkDecal.Play();

            _direction = (_moveTarget.WithNewY(transform.position.y) -
                transform.position).normalized;
            _lookRotation = Quaternion.LookRotation(_direction, Vector3.up);
            _needToRotate = true;

            StopNavigation();

            CurrentMovement = MovementStates.Walk;

            if (IsNavigating && Vector3.Dot(_direction, transform.forward) >= 0.25f) {
                _agent.SetDestination(_moveTarget);
            }
        }
    }
}
That’s it! Hope back over to Unity and add the particle system as a reference to the public variable. Push play and you should now have a decal that appears.