Create a compass and objectives with uGUI
Keeping players engaged in your game can be a challenging task. For some games, guiding the player towards key objectives is incredibly important and can make or break engagement. A popular approach is to provide a compass that has icons overlay the direction that they should move.
In this tutorial, you will create a general compass that has an overlay of gathering objectives for the player to complete. When the player reaches an objective, a UnityEvent is raised which will equip the new equipment and destroy the ‘dummy’ world objective.
Learning Objectives
In this tutorial you’ll learn how to:
- Work with uGUI components, such as canvas, image, and masking.
- Rotate a repeating texture based on the user input.
- Create a prefab.
- Use UnityEvent to call a custom method to handle when an objective is completed.
Prerequisites
- You will need Unity 2020.3 LTS or later to follow along.
- This tutorial assumes you already have basic knowledge of Unity and intermediate knowledge of C#.
Resources
This tutorial uses the following resources:
- Icons from Game-Icons
Getting started
This tutorial builds on top of a demo scene that is included in the starter project. You can download the starter project by:
- Clone and/or download the GitHub repository.
- Navigate to the create-a-compass-with-ugui\\projects\\compass-gui-starter folder in Unity.
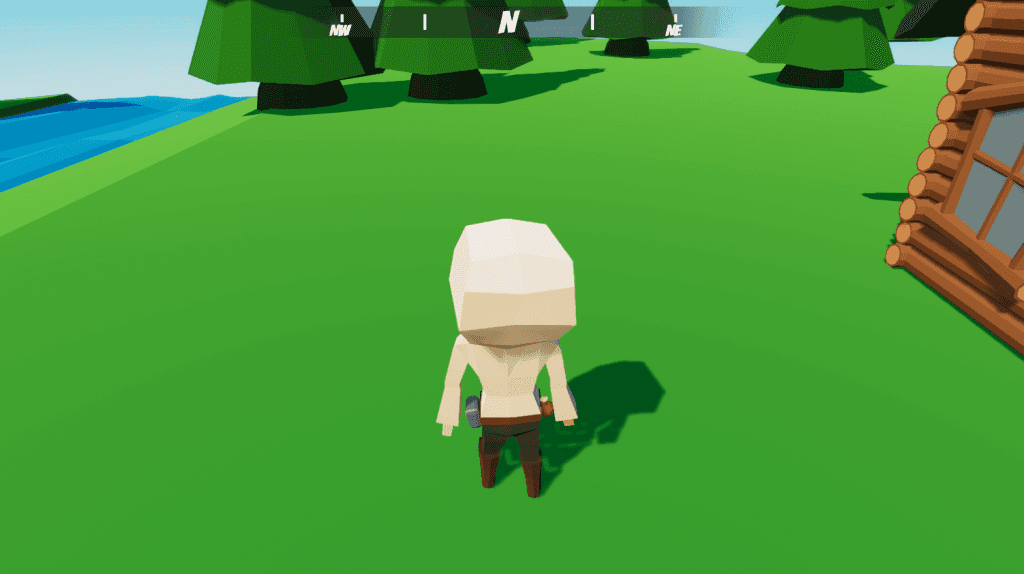
You will see several folders folders in Assets/WUG. The project comes with a Demo scene, models, animations, sprites, textures, prefabs, and materials. You’ll use assets from the Sprites and Materials folder throughout the tutorial. The rest is included for the demo scene, which is where you will work in. Open the scene by navigating to Assets/WUG/Scenes/Demo. Push play and use WASD to move the player around. Not super interesting… yet!
Lets get started adding the rest of the logic to make this a fully functioning demo.
Soft Mask for UGUI
The starter project comes with a 3rd party package called SoftMaskForUGUI. It is used to soften the edges of the compass and give a bit of polish to the look. Using the package is completely optional, and you can skip the steps in this tutorial that reference it.
Create the compass UI
The first thing that the scene needs is a nice compass at the top. You will use uGUI to create it, which means that you’ll build the UI directly in the scene. (Unlike UI Toolkit, which follows a different paradigm.) Here’s how you can create the UI:
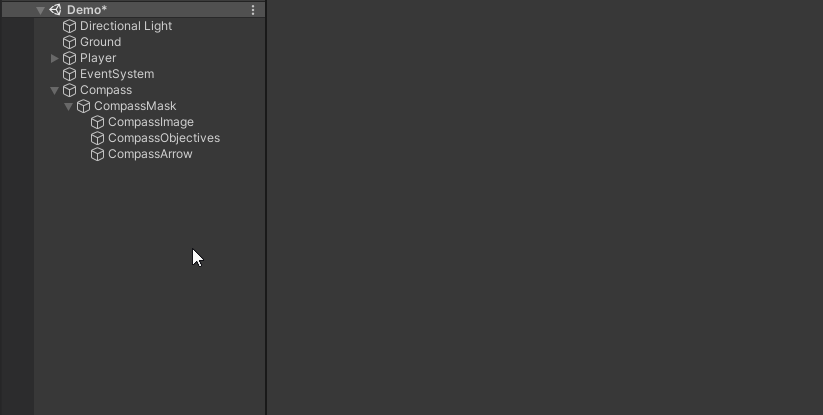
- Add a new Canvas game object by going to GameObject \> UI > Canvas on the top menu. Rename it to Compass.
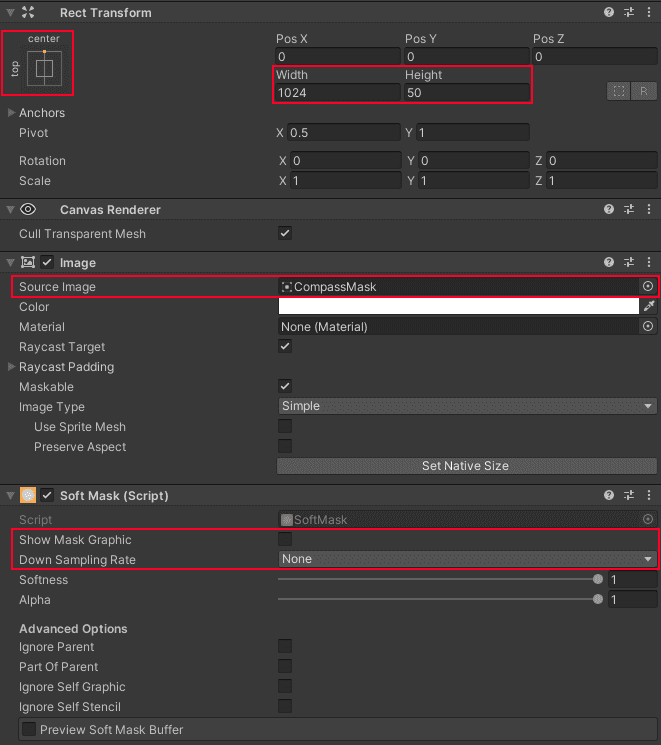
- Right click on Compass and go to UI \> Image. Name it CompassMask.
Note: A Canvas specifies the area that the UI elements should be inside of. All UI elements that you want to draw must be a child of a GameObject with a canvas on it. One of the more common properties that you can set is the Render Mode, which lets you pick screen space or world space.
Set the following properties:
- Rect Transform \> Width: 1024
- Rect Transform \> Height: 50
- Rect Transform \> Position: Top Center
- Image \> Source Image: CompassMask
Note: UI GameObjects have a Rect Transform instead of a Transform. This gives you the ability to set important properties, such as the Pivot and Anchor. A Pivot defines how rotation, scale, and size properties will apply. The Anchor defines how a child Rect Transform will behave in the event that it’s parent Rect Transform is altered. Check out the Basic Layout section of the documentation for more information.
Click Add Component and pick Soft Mask. Set the following properties:
- Down Sampling Rate: None
- Show Mask Graphic: False
Note: Use the Mask component if you are skipping using the Soft Mask package. Make sure to set Show Mask Graphic to false.
Right click on CompassMask and go to UI \> Panel. Change the following:
- Name: CompassContainer
- Image \> Color: 2B2B2B
Click Add Component and pick Soft Maskable. Leave the default properties.
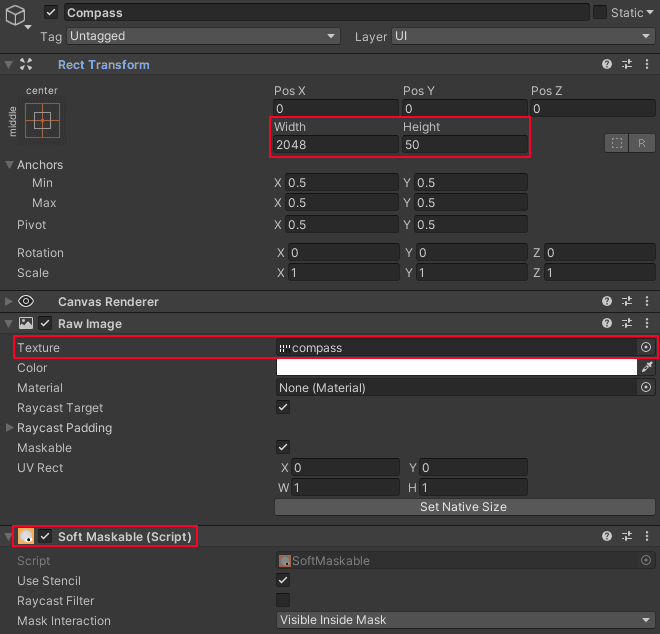
Right click on CompassContainer and go to UI \> Raw Image. Set the following:
- Name: CompassImage
- Rect Transform \> Width: 2048
- Rect Transform > Height: 50
- Raw Image \> Source Image: Compass
Click Add Component and pick Soft Maskable. Leave the default properties.
Your scene should now look like this:
Compass objectives
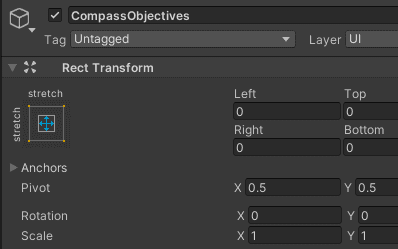
Each new objective will be added as a sprite to the compass. To keep the UI clean, they’ll be added as a child of a game object, called CompassObjectives. Right click on CompassMask and select Create Empty. Name it CompassObjectives. Set the Rect Transform to Stretch both directions.
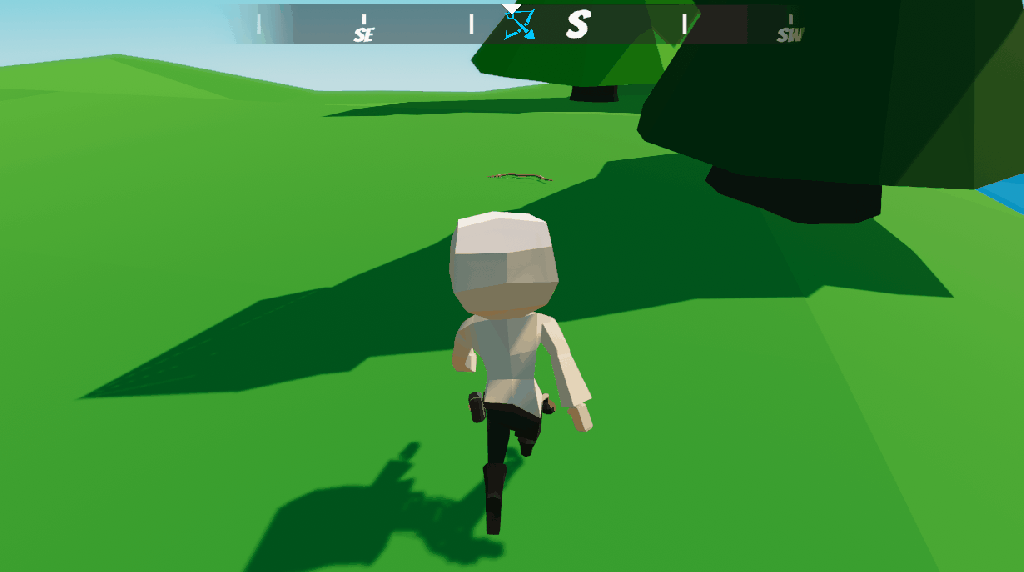
Compass arrow
The final task is to add an arrow to the top center of the compass so people know which way they are facing. Right click on CompassMask and go to UI \> Image. Name it CompassArrow. Set the following properties:
- Rect Transform \> Anchor: Top Center
- Rect Transform \> Position Y: 12
- Rect Transform \> Width & Height: 25
- Image \> Source Image: Diamond
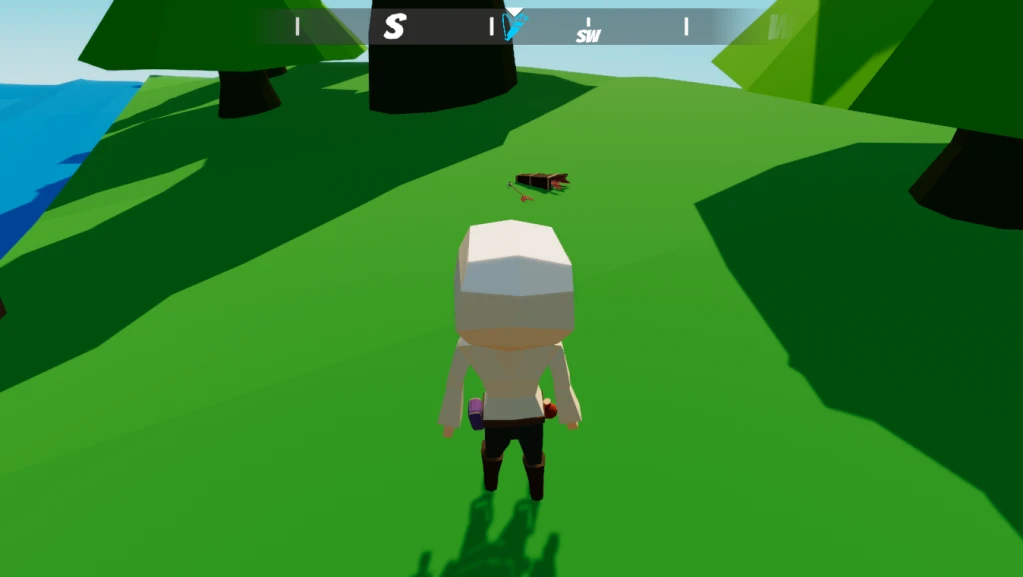
Your scene should now look like this:

Rotate the compass
If you were to push play and rotate the player (right mouse button), you’d notice that the compass does not move. You’ll add the functionality now. Create a new script called CompassManager. Add the following code:
using UnityEngine.UI;

public class CompassManager  : MonoBehaviour
{
    public static CompassManager Instance;
    public RawImage CompassImage;

    private void Awake()
    {
        if (Instance == null)
        {
            Instance = this;
            DontDestroyOnLoad(gameObject);
        }
        else if (Instance != this)
        {
            Destroy(gameObject);
        }
    }

    private void LateUpdate() => UpdateCompassHeading();

    private void UpdateCompassHeading()
    {
        if (PlayerController.Instance == null)
        { return; }

        Vector2 compassUvPosition = Vector2.right *
            (PlayerController.Instance.transform.rotation.eulerAngles.y / 360);

        CompassImage.uvRect = new Rect(compassUvPosition, Vector2.one);
    }
}
Compass Manager is setup using the singleton pattern by creating a static Instance variable and ensuring that only one instance exists via code in Awake. The rest of this class is pretty straight forward:
- Line 19 is calling
UpdateCompassHeading()at the end of the frame, which updates the compass orientation.
UpdateCompasHeading()calculates the compass UV position based on the rotation of the player. Then it sets the UV Rect of the raw image to the newly calculated rotation. This creates the effect of a repeated texture.
Note: Whether or not you use the singleton pattern in your game is entirely up to you – in some cases they’re helpful and in other cases you can create complicated dependencies that cause difficult to trace bugs.
Note: The Wrap Mode of an image must be set to Repeat for this to work properly. You skipped this step because the starter project came with the compass texture already imported. Click on the Compass Sprite under the Assets/WUG/Sprites folder to see the settings.
Add CompassManager as a component to theCompassgame object. Add theCompassImagechild as a reference to theCompassImageproperty.
Push play and use the right mouse button to rotate the player. You should see the compass move with it.
World space objectives
This is great, but a compass would be a lot more useful if the direction of an objective was available. To simulate this working, you will create two world objectives for the player to gather. A world objective will have the ability to define a color, icon, and methods to call when completed. Each world objective will register themselves with the compass, which will cause a UI objective to be configured and maintained. This section will walk through creating the world objective.
Code the objective class
In the Scripts folder, create a new class called Objective and add the following code:
public class Objective : MonoBehaviour
{
    [SerializeField]
    private Color _iconColor = new Color(0, .8f, 1);
    [SerializeField]
    private Sprite _objectiveIcon;
    [SerializeField]
    private UnityEvent _onCompleteEvents;

    private void OnTriggerEnter(Collider other)
    {
        _onCompleteEvents.Invoke();
        Destroy(this.gameObject);
    }
}
_iconColor and _objectiveIcon define how the objective will show up on the UI. OnTriggerEnter is called when the player enters the object’s collider. It’ll loop through all events referenced in _onCompleteEvents and invoke them. Once done, it destroys the world object.
Note: UnityEvents are a very handy way to create the ability to do callback methods in your scene. They’re very helpful for decoupling your workflows (among other things).
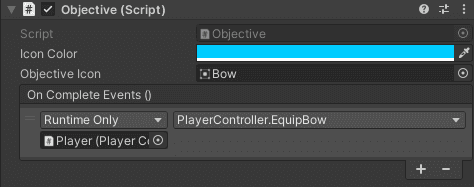
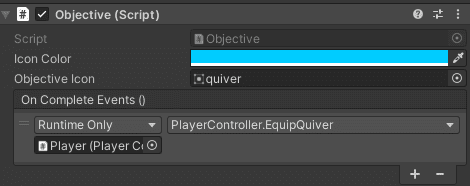
Go back to Unity and add Objective as a component toObjective\_BowandObjective\_Quivergame objects that are in your scene. Set the following properties for each.
Note: The PlayerController component is located on the Player game object.
Objective\_Bow:
- Objective Icon: bow
- On Complete Events:
PlayerController.EquipBow
Objective\_Quiver:
- Objective Icon: quiver
- On Complete Events:
PlayerController.EquipQuiver
Create the compass objective
As mentioned above – in addition to each objective being represented in world space, they’ll also live in screen space on the compass. This next section walks through creating the UI objective prefab and coding the logic to handle spawning, configuring, and updating it.
Code the CompassObjective class
Create a new class called CompassObjective and add the following code:
public Image ObjectiveImage;
public bool IsCompassObjectiveActive { get; private set; }
private RectTransform _rectTransform;
public Transform WorldGameObject { get; private set; }

public const float MinVisibilityRange = 5;
public const float MaxVisibilityRange = 30;

public CompassObjective Configure(GameObject worldGameObject, Color color,
    Sprite sprite = null)
{
    WorldGameObject = worldGameObject.transform;
    _rectTransform = GetComponent<RectTransform>();

    ObjectiveImage.color = color;
    if (sprite != null)
    {
        ObjectiveImage.sprite = sprite;
    }

    ObjectiveImage.transform.localScale = Vector3.zero;

    UpdateCompassPosition();

    return this;
}

private void LateUpdate() => UpdateCompassPosition();

public void UpdateCompassPosition()
{
    if (WorldGameObject == null || !IsCompassObjectiveActive
        || CompassManager.Instance == null)
    { return; }

    _rectTransform.localPosition = Vector2.right * GetObjectiveAngle(WorldGameObject)
        * (CompassManager.Instance.CompassImage.rectTransform.sizeDelta.x / 2);
}

private void Update() => ObjectiveImage.transform.localScale =
    Vector3.Lerp(ObjectiveImage.transform.localScale, IsCompassObjectiveActive
&& WorldGameObject != null ? Vector3.one : Vector3.zero, Time.deltaTime * 8);Configureis responsible for setting up the game object on the UI. This will be done by instantiating theCompassObjectiveprefab as a child of the compass. It also sets the proper color, sprite and makes sure that the local scale is correct. Once configured,UpdateCompassPosition is called, which calculates the correct localPosition based on the angle of the objective from the player. UpdateCompassPosition is also called inLateUpdate, ensuring that it’s updated at the end of each frame.
Add the following two methods to the class to calculate the objective’s angle and direction and one to update the visibility:
public static float GetObjectiveAngle(Transform worldObjectiveTransform) =>
    PlayerController.Instance == null ? -1 :
        Vector3.SignedAngle(PlayerController.Instance.transform.forward,
        GetObjectiveDirection(worldObjectiveTransform,
        PlayerController.Instance.transform), Vector3.up) / 180;

private static Vector3 GetObjectiveDirection(Transform objectiveTransform,
    Transform sourceTransform) => (new Vector3(objectiveTransform.position.x,
        sourceTransform.position.y, objectiveTransform.position.z) -
        sourceTransform.position).normalized;

public void UpdateUiIndex(int newIndex)
{
    _rectTransform.SetSiblingIndex(newIndex);
    UpdateVisibility();
}

private void UpdateVisibility()
{
    if(PlayerController.Instance == null)
    { return; }

    float currentDistance = Vector3.Distance(WorldGameObject.position,
        PlayerController.Instance.transform.position);

    IsCompassObjectiveActive = currentDistance < MaxVisibilityRange &&
        currentDistance > MinVisibilityRange;
}
GetObjectiveAngle
calculates a signed angle which represents the angle between the player’s forward direction and the direction the player would travel to the objective (GetObjectiveDirection).
- GetObjectiveDirection
- UpdateUiIndex
- UpdateVisibility
A signed angle converts the angle value to a positive or negative (-/+), which indicates whether the direction is to the right or the left of the initial vector (the first parameter – considered “from”). A negative number is to the left, and a positive number is to the right.
A normalized vector converts the values to be between 0 and 1. Consider an example where you have a vector of {y: 3, x:13, z:5}. If you normalize it, the 13 will now be 1, because it is the largest. Everything else will be scaled relative to that – returning {y:0.23, x:1, z0.38}.
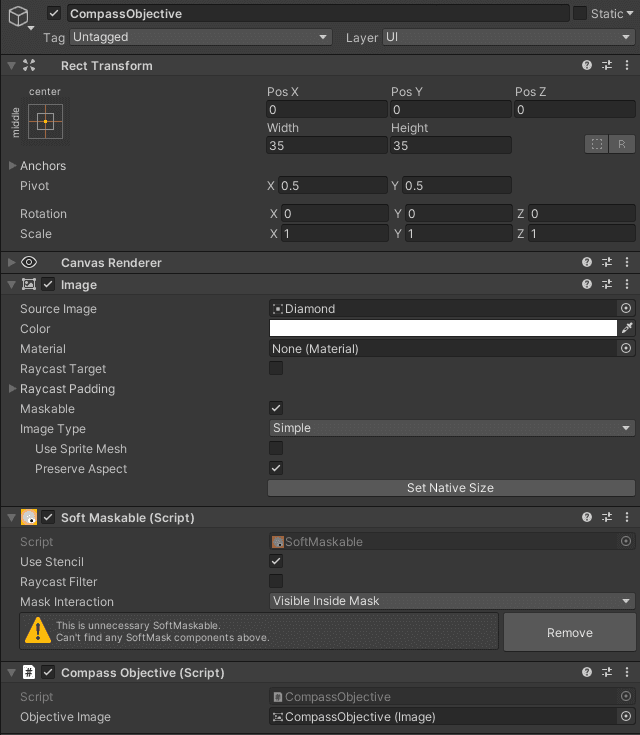
Create the prefab
It’s now time to create the prefab! Right click on Compass and select UI > Image.
- Name it CompassObjective.
- Set the width and height to 40.
- Add the Soft Maskable component and leave the default settings.
- Add the CompassObjective C# script as a component.
Drag the existing Image component to the Objective Image property of CompassObjective.
For the image component, set the following properties:
- Source Image: Diamond
- Raycast Target: False
- Preserve Aspect: True
Diamond is just a placeholder as the actual source image will be changed when the objective is spawned.
Your GameObject should look like this:
Next, convert it to a prefab:
- Drag and drop the CompassObjective game object into the Prefab folder.
- Delete the original from the scene.
Register with CompassManager
Hop back over to CompassManager and add the following code:
public RectTransform CompassObjectivesParent;
public GameObject CompassObjectivePrefab;
private readonly List<CompassObjective> _currentObjectives = new List<CompassObjective>();

private IEnumerator Start()
{
    WaitForSeconds updateDelay = new WaitForSeconds(1);

    while (enabled)
    {
        SortCompassObjectives();
        yield return updateDelay;
    }
}

private void SortCompassObjectives()
{
    if (PlayerController.Instance == null)
    { return; }

    CompassObjective[] orderedObjectives = _currentObjectives
        .Where(o => o.WorldGameObject != null).OrderByDescending(o =>
        Vector3.Distance(PlayerController.Instance.transform.position,
        o.WorldGameObject.position)).ToArray();

    for (int i = 0; i < orderedObjectives.Length; i++)
    {
        orderedObjectives[i].UpdateUiIndex(i);
    }
}

public void AddObjectiveForObject(GameObject compassObjectiveGameObject,
    Color color, Sprite sprite) =>
        _currentObjectives.Add(Instantiate(CompassObjectivePrefab,
        CompassObjectivesParent, false).GetComponent<CompassObjective>()
        .Configure(compassObjectiveGameObject, color, sprite));
Start was transformed to a coroutine which constantly runs the StartCompasObjectives method. StartCompasObjectives()updates the objective sort order based on the distance from the player and sets the proper visibility. AddObjectiveForObject is the method that Objective will call during Startto spawn a UI representation of itself.
Add the reference now by opening Objectiveand add the following start method:
private void Start() => CompassManager.Instance.AddObjectiveForObject
    (gameObject, _iconColor, _objectiveIcon);
Push play and move towards a world objective. You’ll see it disappear from the compass UI in-game as you approach it.
There’s a bit of a problem, though. While it does disappear from the UI, it’s not actually being destroyed. The visibility is being toggled off. This could be very useful if you want to add pooling logic in the future. For this, you’ll keep things simple and destroy it instead.
Destroy a CompassObjective
Open CompassManager and add the following helper method, which will remove all references to the UI game object and destroy it:
public void RemoveCompassObjective(CompassObjective compassObjective)
{
    _currentObjectives.Remove(compassObjective);
    Destroy(compassObjective.gameObject);
}
Next, hop back into CompassObjective and update the UpdateCompassPosition method to be the following:
public void UpdateCompassPosition()
{
    if (WorldGameObject == null)
    {
        if (ObjectiveImage.transform.localScale.magnitude <= 0.1f)
        {
            //we should have been cleared
            CompassManager.Instance?.RemoveCompassObjective(this);
        }

        return;
    }

    if(!IsCompassObjectiveActive || CompassManager.Instance == null){ return; }

    _rectTransform.localPosition = Vector2.right * GetObjectiveAngle(WorldGameObject)
       * (CompassManager.Instance.CompassImage.rectTransform.sizeDelta.x / 2);
}
That’s it! Push play, expand the CompassObjectives game object, and move around. You should now see the objects being destroyed. Hope you found this tutorial helpful! Download the final project to see some added polish, mostly around animations.