Create a health bar that hovers over the player with UI Toolkit
t’s very important to provide the player with status updates on how a character is doing. There’s a wide array of scenarios where this is applicable, but two very common ones are a health bar or a status meter. I recently implemented this behavior in my own game as a status bar that increases over time to show when a guard is becoming more and more alert to your actions. This tutorial will go over the same mechanics that I used to create a runtime bar, but apply them to a health bar that hovers over the player and enemies.
Learning outcomes
There are two ways that you can achieve this within your game. This tutorial will only focus on one of the techniques – which is translating a position from world space to screen space. By the end of this tutorial you will be able to:
- Understand the difference between your two options.
- Design a health bar UI using the UI Builder tool.
- Add a runtime UI to your game.
- Manipulate the UI by converting world point to screen point.
- Toggle the visibility of a visual element.
Note: There are several topics that will not be covered in-depth, due to other tutorials tackling them already. If you are new to UI Toolkit and/or UI Builder, I highly recommend the Create a runtime inventory UI with UI Toolkit tutorial, which goes in depth on both subjects. If you’d prefer to just get a quick overview on the most important subjects, see the Debugging & Samples, and Stylesheets and Important Properties sections.
Prerequisites
- You will need Unity 2020.3 LTS or later to follow along.
- This tutorial assumes you already have basic knowledge of Unity and intermediate knowledge of C#.
- Basic understanding of UI Toolkit and UI Builder.
Resources
- “Official” UI Toolkit Runtime documentation
Additionally, this project uses the following free assets (thanks guys!):
- Low Poly Water by Ebru Dogan
- Pirate Kit by Kenney
Getting started
UI Toolkit (formerly UI Elements) is Unity’s new UI system that can be used as an alternative to IMGUI (editor UI) and UIGUI (runtime UI).
Note: As of the writing of this tutorial UI Toolkit is still in preview, so some of the screenshots in this tutorial are likely to change as new releases occur.
Download the project files
This tutorial builds on top of a demo scene that is included in the starter project. You can download the starter project by:
- Clone and/or download the GitHub repository.
- Navigate to the Create-healthbar-ui-toolkit\\projects\\starterProject folder in Unity.
You will see several folders folders in Assets/WUG. The starter project comes with a some what functioning demo scene located at Assets/WUG/Scenes/Demo. The implementation is mostly not relevant, so here are the important pieces to know:
- You can move around with WASD.
- Both ships already have a health script, which sets the max health to 4. You’ll interact with it more later in the tutorial.
- The water deformation script works for this demo, but I would not recommend doing this in a real game. Instead, use a Shader to offload the cost to the GPU. See Making a Water Shader in Unity with URP! by Unity for an example on making nice realistic water.
Install UI Builder & UI Toolkit for runtime
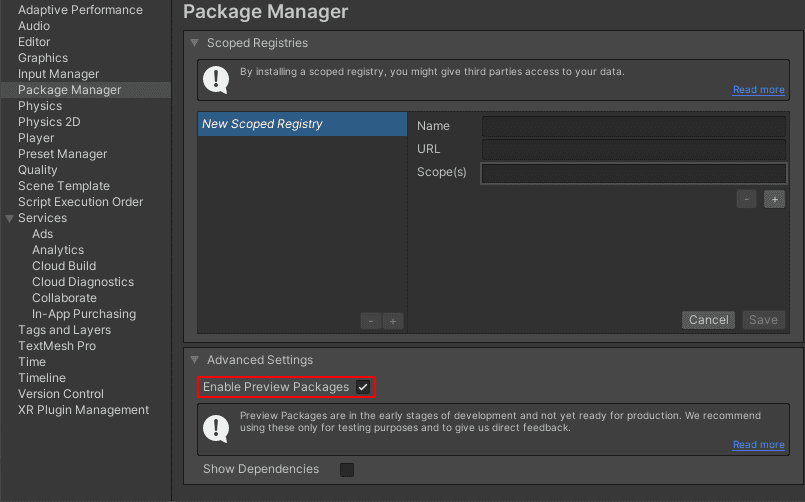
As of this writing, UI Builder is a preview package. Before you can install it, you must enable preview packages by going to:
- Go to Window > Package Manager.
- Click the Settings wheel and choose Advanced Package Settings.
- Under Advanced Settings section, check the Enable Preview Packages button.
To finish installing UI Builder, go back to Package Manager and:
- Change the Packages view to Packages: Unity Registry.
- Search for UI Builder and click Install.
UI Toolkit is now shipped via the Unity Editor. However, the features that are needed to use UI Toolkit at runtime require the installation of the latest package. Since the package is not discoverable in the editor, you will need to add it in Package Manager by doing the following:
- Click on the + button and choose Add Package from git URL.
- Enter the following URL: com.unity.ui
Quick overview of UI Builder
UI Builder is a way to visually create and edit UXML and USS files. I use it all the time, even if I am creating my UI through code but I want to mockup how something might look or to see what the proper syntax is for a style variable. Open UI Builder by going to Window > UI Toolkit > UI Builder.
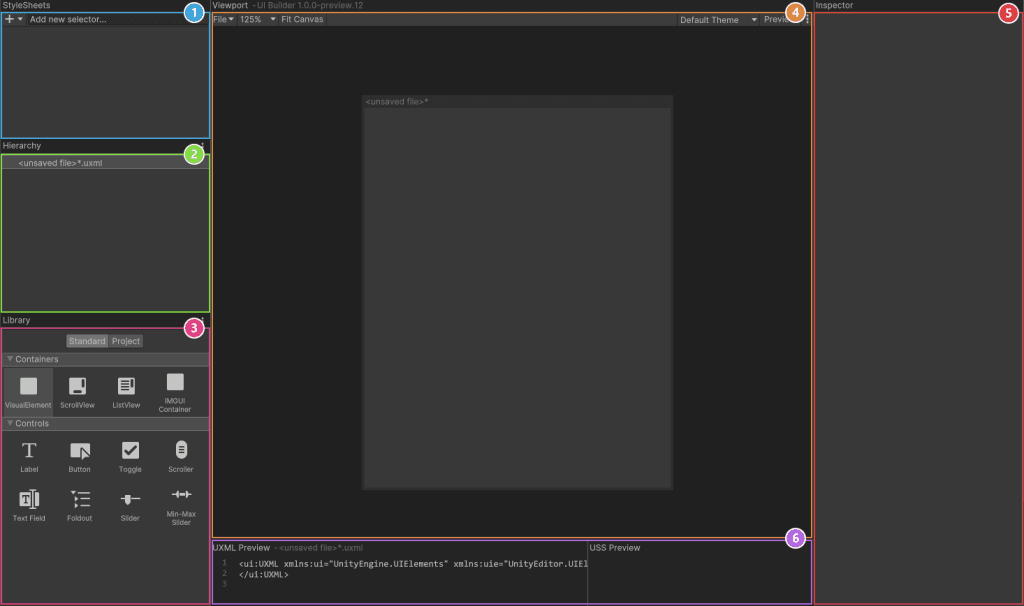
UI Builder is broken out into six different sections:
- StyleSheets: Manage the stylesheets and individual selectors that are used in this document. Style Sheets can be shared across multiple documents.
- Hierarchy: A list of all elements that are within the document.
- Library: Contains a list of standard elements that can be instantiated. The Standard tab contains UI Documents from Unity. The Project tab contains UI Documents created in your project.
- Viewport: Visual of the UI document.
- Inspector: Contains modifiable attributes and style properties for the element currently selected in the hierarchy or StyleSheet sections.
- Code Preview: Displays the UXML and USS code that UI Builder is generating based on your decisions.
UI Builder also comes with a handy debugger and a set of samples. Check out the Debugging & Samples section of the Create a runtime inventory UI with UI Toolkit for more information.
Design the health bar UI
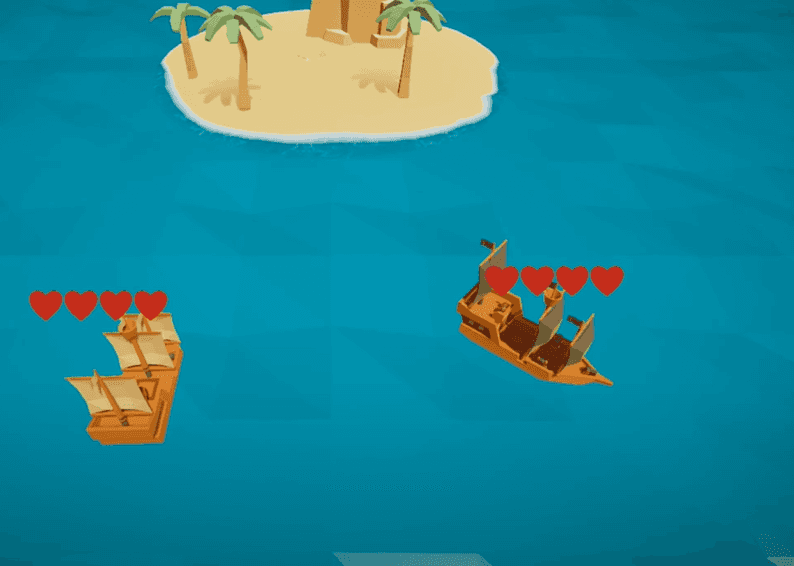
There’s a lot of different styles that you can do with the health bar. Since UI Toolkit does not yet easily support masking, I opted for four hearts that will (dis)appear as needed:

Open UI Builder to create the health bar. To start, drag a VisualElement from the library and drop it in the Hierarchy window. Click on it to pull up the properties in the Inspector panel. Set the following:
- Name: Container
- Flex > Direction: Row
- Align > Justify Content: Space-between
- Size > Width: 175px
- Size > Height: 40px
Drag another VisualElement from the library and make it a child of Container. Set the following properties:
- Name: Heart
- Size \> Width: 25%
- Margin & Padding\> Margin: 1px
- Background > Image: heart\_fill.png
- Background > Image Tint: #C82323
Duplicate Heart three more times. You should now have four Heart visual elements as children to container.
Save your UXML document by going to File > Save As at the top of the Viewport section and name it HealthBar.
Note: The layout engine that UI Toolkit uses is the open source project called Yoga, which implements a subset of Flexbox. Flexbox is an HTML/CSS based layout system. A useful guide to Flexbox can be found here.
How the runtime UI works
You may recall that the “old” Unity UI system had a way to render a UI on it’s own canvas in world space directly. Technically, UI Toolkit has similar functionality in that you can render the UI directly onto a texture which is then displayed on 3D geometry such as a quad. In my opinion, a much easier route is to draw the bar on the UI panel using a transformed world space position.
Note: If you decide to use a Render Texture and need to render a lot of bars, don’t use 100 render textures. Draw them all in one render texture and use UVs to select a Rect to be displayed per quad.
By installing the com.unity.ui package, you gained access to the runtime features of UI Toolkit. Specifically, there’s a new UI Document component which is where you specify two key pieces of information:
- Panel Settings: The panel is the root VisualElement that the UI Document is attached to. It’s what handles drawing the UI in the scene at runtime. There are several settings that you can set to define how the UI should appear.
- UI Document Component: Reference to UXML files that should be associated with the panel (root VIsualElement). You can have multiple of these. It is optional as you can instantiate via code.
If you plan to handle events in the future, you must also have a UI Toolkit Event System component. The Event System component is what processes the input and sends the events to all active panels. Without it, your input will not be routed. There are two you can choose from, depending on if you are using the old or new Input System.
Setup the scene
Create a new PanelSettings asset in the Project window by going to the Create \> UI Toolkit > Panel Settings Asset. Leave it named PanelSettings.
There are two ship GameObjects in the demo scene. One is called Player and the other is NPC. Each ship will have their own health bar.
Click on the Player game object and:
- Add a UI Document component
- Set the Panel Settings property to the PanelSettings asset you generated at the beginning of this section.
- Set Source Asset to HealthBar.
Repeat this process for the NPC game object.
You should now see the HeartBar rendering on the top left corner of the Game window.

Note: Go here for official documentation on setting up your Runtime UI. It has useful information about the display order of multiple UI Documents and how to route the new Input System events.
Move the bar based on world space
It’s great that you can now see the health bars – but this is not where they should be! To fix this, create a new script called HealthbarUI. It will contain all of the code for displaying and animating the health bar. Add the following global variables and Start method:
public Transform TransformToFollow;

private VisualElement m_Bar;
private Camera m_MainCamera;

private void Start()
{
    m_MainCamera = Camera.main;
    m_Bar = GetComponent<UIDocument>().rootVisualElement.Q("Container");
}
Here is the purpose of the variables:
- TransformToFollow: The world space position that the UI should render at. Since the boat can move, you will need a constant reference to follow along with. This will be set through the inspector later.
- m\_Bar: The root VisualElement of the bar.
- m\_MainCamera: This is simply a reference to Camera.main to optimize for performance. Camera.main triggers a depth search across the hierarchy every time it is called which is not great practice.
If you look at the Debugger, you can see how each element was generated. Push play and go to Window \> UI Toolkit > Debugger. Select Panel Settings in the drop down. You should see this:
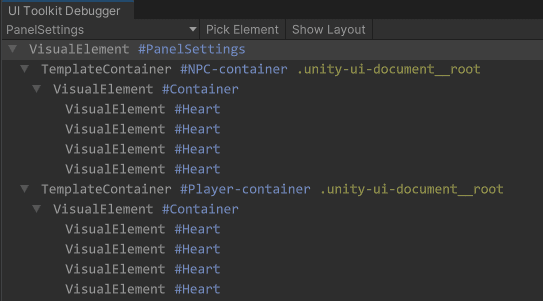
Note: You can generate multiple Panel Settings assets will will impact the grouping of each UI Document. In other words, if you had PanelSettings\_01 and PanelSettings\_02, you’d see each as a top level node instead of just PanelSettings. This can be helpful for click events and layering other Runtime UIs.
Keeping that in mind, there are two important things happening when you set m\_Bar’s reference:
- GetComponent<UIDocument>().rootVisualElement
- .Q("Container")
Note: You can use either Q or Query to search for a specific element within the hierarchy. Providing either the type or the name is optional. In other words, this accomplishes the same thing: m_Bar = GetComponent<UIDocument>().rootVisualElement.Q<VisualElement>("Container");
Use RuntimePanelUtil to set the position
You’ll need to write some code to move the bar to the TransformToFollow’s position, but in screen space. Add a new SetPosition method:
public void SetPosition()
{
    Vector2 newPosition = RuntimePanelUtils.CameraTransformWorldToPanel(
        m_Bar.panel, TransformToFollow.position, m_MainCamera);

    m_Bar.transform.position = newPosition.WithNewX(newPosition.x -
        m_Bar.layout.width / 2);
}
WithNewX is a helper method that is included with this project located under the GeneralExtensions script. It is the equivalent of creating a new Vector 3 with a different X position.
UI Toolkit has two helper methods on the RuntimePanelUtils class that can transform from world space to screen space:
- CameraTransformWorldToPanel: Transforms a world absolute position to a local coordinate on a panel.
- CameraTransformWorldToPanelRect: Transforms a world position and size (in world units) to a local position and size on a panel.
Both of the methods use a camera and the standard/internal WorldToScreen transformation to assist with this. As you can see, in this tutorial you will use CameraTransformWorldToPanel.
The SetPosition method needs to be called in two spots – Once on Start to do the placement and then on every LateUpdate. Using LateUpdate is important for two reasons – It gives the tracked object time to move and lets the Layout engine refresh.
Add SetPosition to Start, which should now look like this:
private void Start()
{
    m_MainCamera = Camera.main;
    m_Bar = GetComponent<UIDocument>().rootVisualElement.Q("Container");

    SetPosition();
}
Next add a LateUpdate method:
private void LateUpdate()
{
    if (TransformToFollow != null)
    {
        SetPosition();
    }
}
Modify the scene
Hop back into the Demo scene as you’ll need to do the following for Player and NPC:
- In the Hierarchy window, add an empty game object as a child of Player \> Model.
- Name it Healthbar\_Pivot.
- Set the Position to (x: 0, y: 21, z: 0).
- Select the Player game object and add HealthbarUI as a new component.
- Set the Transform To Follow property to Healthbar\_Pivot.
Repeat this process for NPC, putting the Healthbar\_Pivot under NPC > Model.
This demo project has a buoyancy script that animates the model game object. By making the Healthbar\_Pivot object a child of Model, you inherit the positioning animation for the UI.
Press play and move the player boat around with WASD. You should now see a health bar track around the screen with your player.
Animate the bar based on the current health
There’s one final thing to do – which is to have the bar accurately represent the current health. I’ll keep things simple by having the hearts appear and disappear by toggling the visibility style property between Visibility.Visible and Visibility.Hidden. Open the HealthbarUI script and add the followingGlobal Variableand set it in Start:
private VisualElement[] m_Hearts;

private void Start()
{
    m_MainCamera = Camera.main;
    m_Bar = GetComponent<UIDocument>().rootVisualElement.Q("Container");
    m_Hearts = m_Bar.Children().ToArray(); //new

    SetPosition();
}
Next, add a new AnimateBar method:
public void AnimateBar(bool increaseHealth)
{

    if (increaseHealth)
    {
        VisualElement nextHeart = m_Hearts.Where(x => !x.visible).FirstOrDefault();
        nextHeart.style.visibility = Visibility.Visible;

    }
    else
    {
        VisualElement nextHeart = m_Hearts.Where(x => x.visible).LastOrDefault();
        nextHeart.style.visibility = Visibility.Hidden;

    }
}
Every time the method is called it’ll do a search for the next available heart visual element that meets it’s criteria and flip the visibility property. As you can see, this can be done easily through styles. Another approach to this is to have classes in a stylesheet that you add/remove.
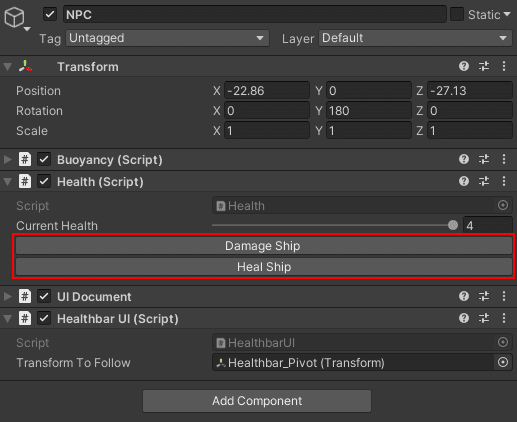
Alright – home stretch! The last thing to do is hook this logic up to the Health script, which came with the demo project. Here’s a quick explanation of the provided methods in the script:
- DamageShip: Reduces the ships health by 1 if it is higher than 0. Once it hits 0 the ship will be “sunk”.
- HealShip: Increases the health of the ship by 1 up to a total of 4. Only works as long as it hasn’t been sunk.
- SinkShip: Sinks the ship by destroying the game object.
There’s also an editor script is included which adds the DamageShip and HealShip methods as buttons on the component so that you can easily test.
Open the Health script and add the following global variable and Start method:
private HealthbarUI m_HealthbarUI;

private void Start()
{
    m_HealthbarUI = GetComponent<HealthbarUI>();
}
Update HealShip and DamageShip to call AnimateBar each time they successfully run:
public void DamageShip()
{
    if (m_CurrentHealth > 0)
    {
        m_CurrentHealth--;

        m_HealthbarUI.AnimateBar(false);
    }

    if (m_CurrentHealth == 0)
    {
        Invoke("SinkShip", 1);
    }
}

public void HealShip()
{
    if (m_CurrentHealth < 4)
    {
        m_CurrentHealth++;
        m_HealthbarUI.AnimateBar(true);
    }
}
That’s it! Push play and hit the damage ship / heal ship buttons to see it work. Remember, if the health hits 0 the ship will be destroyed.