Create an item management editor window with UI Toolkit
Custom tooling is incredibly helpful for streamlining the development of any game. In times past I’ve created tools for quick access for managing the state of the game (cheats) and for debugging the AI. Most recently, I’ve needed to create a custom tool for managing the item database and inventories for characters in my time travel game. A custom screen for managing scriptable object assets can be very handy, especially if you want to require certain actions or add custom validation.
This tutorial will cover the fundamentals of creating a custom editor tool, including what scriptable objects are and how to create, delete and bind to one. You will also learn about ListView and the Object Picker.
Learning outcomes
In this tutorial you will learn the fundamentals needed to create custom editor windows, such as:
- How to open a window via the Unity toolbar.
- What a scriptable object is and how you can create, delete and bind to it in code.
- How to create and configure a ListView and ObjectPicker.
Prerequisites
- You will need Unity 2020.3 LTS or later to follow along.
- Basic knowledge of UI Toolkit and UI Builder. Check out Create a runtime inventory UI with UI Toolkit if you need a primer.
- This tutorial assumes you already have basic knowledge of Unity and intermediate knowledge of C#.
Resources
- This project uses Basic RPG Icons by PONETI
Getting Started
Rather than having you build the UI from scratch, the starter project comes with a starter UI to work off of. You will focus on the steps necessary to hook it up to the data and make it interactive. Make sure you clone or download the starter project, which is on the GitHub repository.
Once you open the project, you’ll see the following under the Assets/WUG folder:
- 3rd Party: Icons from the Basic RPG Icons pack.
- UI Toolkit: UXML and USS files for the shell of a UI which you will code on top of.
The project already has the UI Builder package installed as well.
Remember to check out the Create a runtime inventory UI with UI Toolkit if you need a primer on UI Toolkit and/or UI Builder.
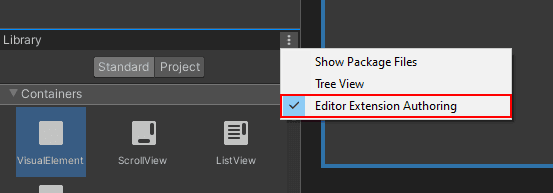
Editor Extension Authoring
UI Builder will default to assuming that any new UXML is intended for runtime, which means that controls that are not supported runtime will be hidden. To switch modes, click on the hamburger menu in the Library tab and enable Editor Extension Authoring.
Note: You do not need to do this now, since you are not building the UI from scratch. I just wanted to call this out, so you know for your own projects.
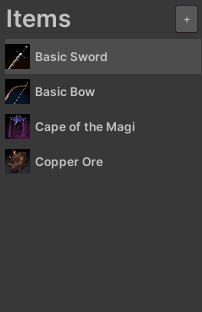
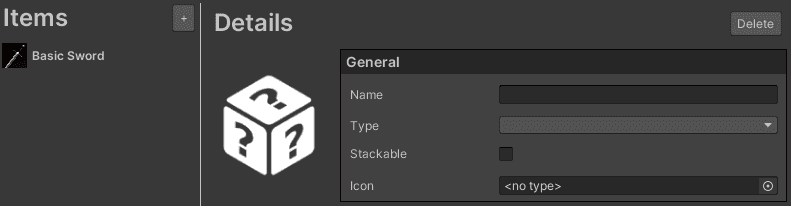
A look at the included UI
There are two sections to the UI. The left is a list of all items, populated by assets that exist in the Data folder, which will be created shortly. The right displays the details of a selected item. You will be able to add a new item with the + button and delete an existing with the Delete button.
Load the window
Being able to open the window is the first place you’ll want to start, which will be done via the top toolbar. Create a new script called ItemDatabase. Have it inherit from EditorWindowand add the following two methods:
public class ItemDatabase : EditorWindow
{
    private Sprite m_DefaultItemIcon;

    [MenuItem("WUG/Item Database")]
    public static void Init()
    {
        ItemDatabase wnd = GetWindow<ItemDatabase>();
        wnd.titleContent = new GUIContent("Item Database");

        Vector2 size = new Vector2(800, 475);
        wnd.minSize = size;
        wnd.maxSize = size;
    }

    public void CreateGUI()
    {
        var visualTree = AssetDatabase.LoadAssetAtPath<VisualTreeAsset>
            ("Assets/WUG/Editor/ItemDatabase.uxml");
        VisualElement rootFromUXML = visualTree.Instantiate();
        rootVisualElement.Add(rootFromUXML);

        var styleSheet = AssetDatabase.LoadAssetAtPath<StyleSheet>
            ("Assets/WUG/Editor/ItemDatabase.uss");
        rootVisualElement.styleSheets.Add(styleSheet);

       m_DefaultItemIcon = (Sprite)AssetDatabase.LoadAssetAtPath(
           "Assets/WUG/Sprites/UnknownIcon.png", typeof(Sprite));
    }
}
Init() creates a new window of type ItemDatabase and sets the title of the window via thetitleContentproperty. The MenuItem attribute tells Unity to add it to the top menu bar. The windowminSizeandmaxSizeare set to the same Vector2 value to prevent the user from resizing the window. Alternatively, you can choose to set only one of these values, or none.
CreateGUI is called when the EditorWindow’s rootVisualElement is ready to be drawn. Here is what the method is doing:
- Lines 19-26 uses the Asset Database to load the UXML and USS that came with the starter project into memory and then adds them to the root visual element of the window.
- Lines 30-31 use the Asset Database to load the default icon sprite into memory.
In Unity go to WUG \> Item Database to open the window.

Note: There is a bug that sometimes prevents the Item Database window from opening. The workaround is either to restart Unity or to reset the layout of the editor by going to Window \> Layouts and picking any of the options.
Define the Item asset
The Item asset will be based on a scriptable object. A scriptable object is a data container. When you create a new C# script that is a scriptable object, you are defining the data structure that each asset of it’s type will have. You cannot attach a scriptable object as component to a GameObject. Rather, they are an asset that lives in your project.
There are two important things to know when creating a new Scriptable Object:
- The C# script must inherit from ScriptableObject.
- You can add a CreateAssetMenu attribute, which gives you the ability to create a new asset from the Assets/Create submenu.
It’s worth noting that ScriptableObjects receive three callbacks: OnEnable, OnDisable, OnDestroy. If you want a much deeper walk through of Scriptable Objects, check out Richard Fine’s talk at Unite 2016, Overthrowing the MonoBehaviour Tyranny in a Glorious Scriptable Object Revolution.
For this tutorial, you’ll have an Item with a few basic properties to describe it. Create a new script called Item and add the following:
[CreateAssetMenu(fileName = "New Item", menuName = "Data/New Item", order = 1)]
public class Item : ScriptableObject
{
public string ID = Guid.NewGuid().ToString().ToUpper();
public string FriendlyName;
public string Description;
public Categories Category;
public bool Stackable;
public int BuyPrice;
[Range(0,1)]
public float SellPercentage;
public Sprite Icon;
public enum Categories
{
Food,
Weapon,
Junk
}
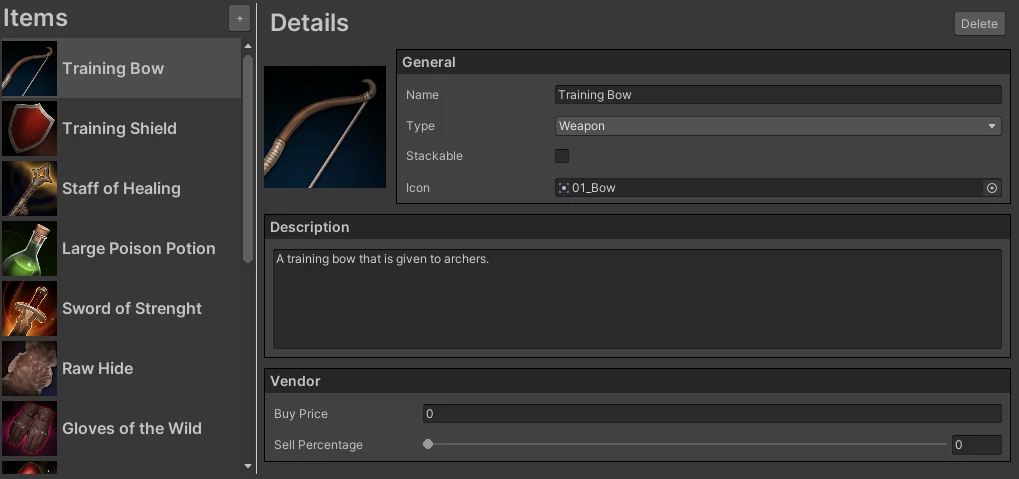
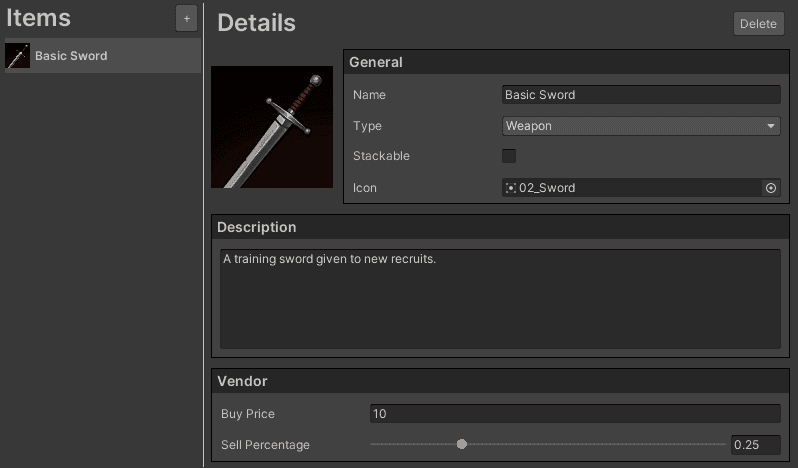
}Hop back over to Unity and create a new folder called Data. Add a new Item asset by right clicking and going to Create > Data > New Item. Copy the ID from the inspector and set it to the name of the asset. Set the following properties:
Friendly Name: Basic Sword
- Description: A training sword given to new recruits.
- Category: Weapon
- Stackable: False
- Buy Price: 10
- Sell Percentage: 0.25
- Image: 02\_Sword
This is great, but it feels a bit tedious and as the dataset gets larger it will be more difficult to manage. Time to setup the editor window!
Create and populate the ListView
A ListView is a vertically scrollable area that displays a list of items. You must specify a visual representation of each item and bind it to a dataset (e.g., list or array). This allows for an incredible level of flexibility – you can have a list of labels, icons, or any other combination of elements.
Binding is another important concept to understand when creating editor tooling. Binding describes the automatic connection between a UI element and a property in the data. Depending on the element, a binding can be read-only, write-only or read/write.
A ListView only creates visual elements for visible items and will recycle each visible item to new data as the user scrolls. For example, lets say you have a list of 20 items but only enough space to display 5 of them. The ListView knows about all 20 items (through binding) but will only show the first 5. As the user scrolls, each item that has been rendered visually will continue to exist, but the data will be swapped out to show the next in the dataset, such as the 6th item.
Create the Item Template
Every item in the ListView will be based off a “visual template”. The template provides a starter structure for each item, which the ListView will create and then modify properties through binding. The “visual template” will display the icon and the friendly name, like so:
Let’s create the visual template. Open UI Builder by going to Window \> UI Toolkit > UI Builder and create a new UXML by going to File > New in the viewport.
Drag and drop a Visual Element into the Hierarchy and set the following properties:
- Name: ItemRow
- Align > Justify Content: Center
- Size > Height: 35 px
Add a child Visual Element to ItemRow and set the following properties:
- Name: Row
- Flex \> Direction: Row
- Align > Align Items: Center
Add a child Visual Element to Row and set the following properties:
- Name: Icon
- Size \> Height & Width: 25px
- Background \> Image: UnknownIcon
Add a child Label to Row and set the following properties:
- Name: Name
- Text: Unknown
- Flex \> Basis \> Grow: 1
- Margin & Padding > Padding: 5px 2px 0px 0px
Your UI Builder window should look like this:

Save the file by going to File \> Save in the viewport and name it ItemRowTemplate.
Create the dataset
The ListView will be bound to a list of Item assets, which are instances of the scriptable object you created earlier. This means that you need to initialize and populate the list by scanning the data directory. Head back over to your ItemDatabase script and add the following code:
private static List<Item> m_ItemDatabase = new List<Item>();

public void CreateGUI()
{
     // ...previous code in method is above
     LoadAllItems();
}

private void LoadAllItems()
{
    m_ItemDatabase.Clear();

    string[] allPaths = Directory.GetFiles("Assets/Data", "*.asset",
        SearchOption.AllDirectories);

    foreach (string path in allPaths)
    {
        string cleanedPath = path.Replace("\\", "/");
        m_ItemDatabase.Add((Item)AssetDatabase.LoadAssetAtPath(cleanedPath,
            typeof(Item)));
    }
}
Save the file by going to File \> Save in the viewport and name it ItemRowTemplate.
LoadAllItems uses the directory API to scan a specific folder (Assets/Data) for any objects that are of type asset. The ForEach statement corrects the slashes in the path and adds a reference to the item to the list through the use of AssetDatabase.
LoadAllItems is called at the end of CreateGUI so that it is populated right away.
Note: Make sure to change the path passed into Directory.GetFiles if you used a different directory structure.
Create the ListView
Next up is creating the ListView control and adding it to the window. Add the following code to ItemDatabase:
private VisualElement m_ItemsTab;
private static VisualTreeAsset m_ItemRowTemplate;
private ListView m_ItemListView;
private float m_ItemHeight = 40;

public void CreateGUI()
{
     // ...previous code in method is above
    m_ItemsTab = rootVisualElement.Q<VisualElement>("ItemsTab");
    GenerateListView();
}

private void GenerateListView()
{
    Func<VisualElement> makeItem = () => m_ItemRowTemplate.CloneTree();

    Action<VisualElement, int> bindItem = (e, i) =>
    {
        e.Q<VisualElement>("Icon").style.backgroundImage =
            m_ItemDatabase[i] == null ? m_DefaultItemIcon.texture :
            m_ItemDatabase[i].Icon.texture;
        e.Q<Label>("Name").text = m_ItemDatabase[i].FriendlyName;
    };

    m_ItemListView = new ListView(m_ItemDatabase, 35, makeItem, bindItem);
    m_ItemListView.selectionType = SelectionType.Single;
    m_ItemListView.style.height = m_ItemDatabase.Count * m_ItemHeight;
    m_ItemsTab.Add(m_ItemListView);
}
The new lines in CreateGUI are getting the necessary references and calling the new GenerateListView method.
As mentioned above, a ListView is made up of two components – the view and the data. Keep this in mind as you explore what GenerateListView is doing:
- Line 14 is defining what each item will visually look like. In this case, the makeItem function is creating a clone of the ItemRowTemplate.
- Lines 16-22 are defining the binding of each individual Item that is created. Specifically, it binds the Icon visual element to the scriptable object’s Icon property and the Name label to the FriendlyName property.
- Lines 24-27 are creating the ListView and feeding in all of the necessary properties via the constructor. It’s setting the dataset (which is m\_ItemDatabase), a row height for each item, the visual template (makeItem function) and a template for binding (bindItem action). The next two lines are setting the type of selection the user can do (single) and the total height for the ListView. Finally, it’s adding the ListView as a child of m\_ItemsTab.
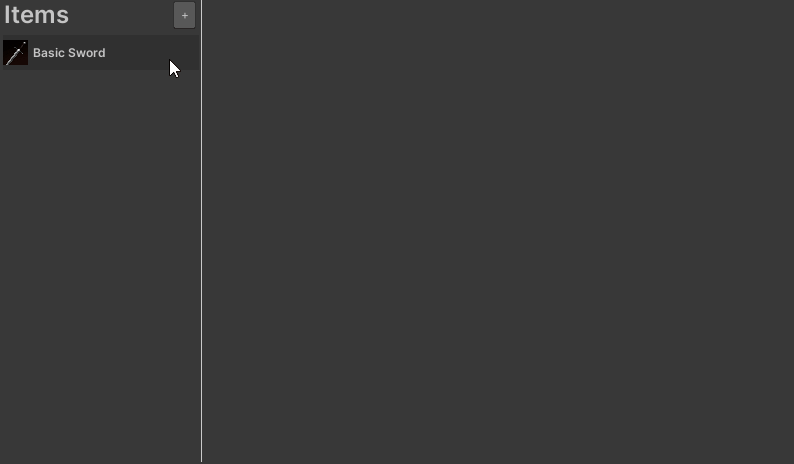
Close and re-open the Item Database window. You should now see your single Item asset appear on the list!
Note: Beginning Unity version 2021.2, ListView will take a minimum height and grow by default. However, if you are using an earlier version then you must make sure to set the property.
Bind the Details section
Binding is incredibly powerful and with UI Toolkit, you can bind data to a top-level visual element which will also bind all the children. This makes swapping out the dataset extremely easy. To connect the control to a bound element you need to do two things:
- Set the binding of an element in the hierarchy of the controls to a SerializedObject.
- Set the bindingPath property of the control to the string name of the property that exists in your SerializedObject.
Note: You can read more about binding in the Unity Manual.
You will setup the bindingPath for each of the elements to start. Open ItemDatabase.uxml in UI Builder by going to Window \> UI Toolkit > UI Builder > File > Open. In the hierarchy section, expand all the Row nodes under ScrollView\_Details. This is where all the different controls available in the Details section of the Window are. Click on the ItemName control and set the binding path to FriendlyName.
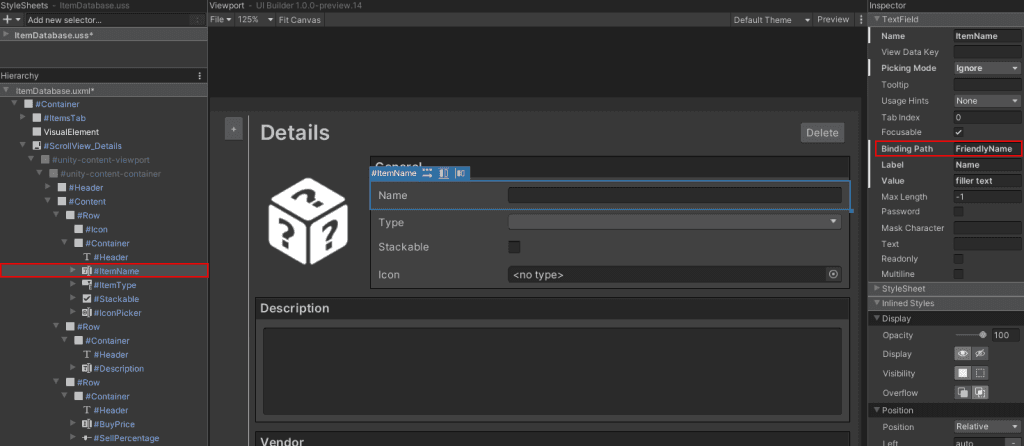
You’ll need to repeat this process for all the controls. Here’s what you’ll set each one to (formatted as Control Name: Binding Path):
- ItemType: Category
- Stackable: Stackable
- IconPicker: Icon
- Description: Description
- BuyPrice: BuyPrice
- SellPercentage: SellPercentage
Configure IconPicker, the ObjectPicker Control
There’s one more thing to do before you close UI Builder. IconPicker is derived from the ObjectPicker control, which means that you need to set the Type property. If you do not set it, then when you try to use the control, nothing will appear in the pop up window. The Type property must be the full namespace, such as UnityEngine.GameObject.
Here’s how to set it:
- Click on IconPicker.
- Set Type to UnityEngine.Sprite.
You should see the field change immediately in the ViewPort.

Note: Setting the type to UnityEngine.Sprite will automatically add the UnityEngine.CoreModule namespace.
Set the SerializedObject Binding
You need to set the SerializedObject binding to the ScrollView of the details section before you can test the flow is working. Add the following code to the ItemDatabase script:
private ScrollView m_DetailSection;
private VisualElement m_LargeDisplayIcon;
private Item m_activeItem;

public void CreateGUI()
{
    // ...previous code in method is above

    m_DetailSection = rootVisualElement.Q<ScrollView>("ScrollView_Details");
    m_DetailSection.style.visibility = Visibility.Hidden;
    m_LargeDisplayIcon = m_DetailSection.Q<VisualElement>("Icon");
}

private void GenerateListView()
{
    // ...previous code in method is above
    listView.onSelectionChange += ListView_onSelectionChange;
}

private void ListView_onSelectionChange(IEnumerable<object> selectedItems)
{
    m_activeItem = (Item)selectedItems.First();

    SerializedObject so = new SerializedObject(m_activeItem);
    m_DetailSection.Bind(so);

    if (m_activeItem.Icon != null)
    {
        m_LargeDisplayIcon.style.backgroundImage = m_activeItem.Icon.texture;
    }
    m_DetailSection.style.visibility = Visibility.Visible;
}
Here’s what the new code is doing:
- Lines 9-11 are setting the reference for m\_DetailSection and hiding it on first load to create a slightly smoother experience.
- Line 17 is hooking up a listener for when the user selects a new item on the list. It’s worth noting that a ListView has two callback methods – onSelectionChange and onItemsChosen.
ListView\_onSelectionChange is the callback method that is triggered when the user selects a new item on the list. It includes a reference to all the objects that the user has selected. Here’s a breakdown of the code:
- Line 22 grabs the first item in selectedItems and casts it to type Item. Since the ListView selection type is single, we can safely pick only the first item.
- Lines 24-25 creates a new SerializedObject based on the selectedItem object. m\_DetailSection, the top-level visual element, is bound to the newly created SerializedObject. This ensures that all the children controls also receive the binding.
- Line 27\+ is setting the LargeDisplayIcon control background image to the Icon property of the Item. This is because LargeDisplayIcon is not bound to anything, so it must be set manually. The m\_DetailSection’s visibility is also set to visible so the user can see the details.
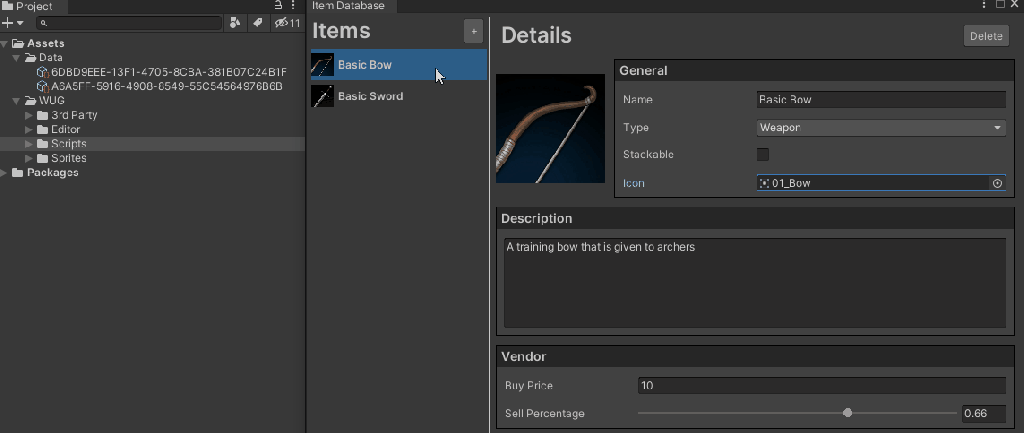
That’s it! Go back to Unity and reopen the window. Click on the Basic Sword and you should see everything populated. Try changing any of the values, such as the name of the sword. Close/Open the window and you will see that the value is still set to your new one.
Setup the “add” button
Next up is creating a new asset via the window. Add new code to ItemDatabase to register a new event handler for the button and create the item:
public void CreateGUI()
{
    // ...previous code in method is above
    rootVisualElement.Q<Button>("Btn_AddItem").clicked += AddItem_OnClick;
}

private void AddItem_OnClick()
{
    //Create an instance of the scriptable object and set the default parameters
    Item newItem = CreateInstance<Item>();
    newItem.FriendlyName = $"New Item";
    newItem.Icon = m_DefaultItemIcon;

    //Create the asset, using the unique ID for the name
    AssetDatabase.CreateAsset(newItem, $"Assets/Data/{newItem.ID}.asset");

    //Add it to the item list
    m_ItemDatabase.Add(newItem);

    //Refresh the ListView so everything is redrawn again
    m_ItemListView.Refresh();
    m_ItemListView.style.height = m_ItemDatabase.Count * m_ItemHeight;
}
The method does a few things for a smooth experience:
- Lines 10-12 are creating a new instance of the Item scriptable object in memory and setting default properties.
- Line 15 takes the Item instance in memory and writes it to your project folder, using the Item ID as the name of the file. Using the ID ensures that the name is always unique and avoids having to rename the file if the user changes the name of the item later.
- Line 18 adds the new Item to the Item Database list, so that the ListView will have access to it.
- Lines 21-22 are refreshing the UI of the ListView and recalculating the height.
Test and debug the UX
Give the new code a test by doing the following:
- Reopen the Item Database Window.
- Click the + button next to the Items header. You should see an item called “New Item” appear on the list.
- Click on New Item and set the Friendly Name to “Basic Bow“.
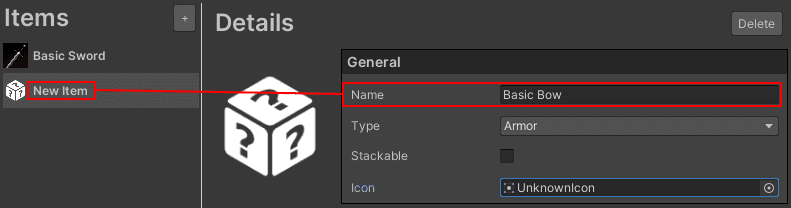
Did you notice that the ListView doesn’t change? You can fix this by hooking up some code to the RegisterValueChangedCallback events for both the name and the icon:
public void CreateGUI()
{
    // ...previous code in method is above

    m_DetailSection.Q<TextField>("ItemName")
        .RegisterValueChangedCallback(evt =>
        {
            m_activeItem.FriendlyName = evt.newValue;
            m_ItemListView.Refresh());
        }

    m_DetailSection.Q<ObjectField>("IconPicker")
        .RegisterValueChangedCallback(evt =>
        {
            Sprite newSprite = evt.newValue as Sprite;
            m_activeItem.Icon = newSprite == null ? m_DefaultItemIcon : newSprite;
            m_LargeDisplayIcon.style.backgroundImage = newSprite ==
                null ? m_DefaultItemIcon.texture : newSprite.texture;

            m_ItemListView.Refresh();
        });
}
That’s it! Restart the Item Database window and try to create a new item again. Change the friendly name and icon to observe everything working as expected.
It’s important that the new value is set prior to calling m_ItemListView.Refresh(), otherwise you’ll see an update but with outdated information. If you want to see this in action, remove line #8 from your code and type a new “Friendly Name” in slowly. Notice that the character that is displayed on the ListView is not your last one, but the one before?
Setup the “delete” button
Deleting an asset is incredibly straight forward to do. You just need the path of the file. Add the following code to ItemDatabase to register a new event handler for the button and delete the selected item:
public void CreateGUI()
{
    // ...previous code in method is above
    rootVisualElement.Q<Button>("Btn_DeleteItem").clicked += DeleteItem_OnClick;
}

private void DeleteItem_OnClick()
{
    //Get the path of the fie and delete it through AssetDatabase
    string path = AssetDatabase.GetAssetPath(m_activeItem);
    AssetDatabase.DeleteAsset(path);

    //Purge the reference from the list and refresh the ListView
    m_ItemDatabase.Remove(m_activeItem);
    m_ItemListView.Refresh();

    //Nothing is selected, so hide the details section
    m_DetailSection.style.visibility = Visibility.Hidden;

}
Here is what the code is doing:
- Line 4 is registering the clicked event for the DeleteItem button.
- Lines 10-11 is using the AssetDatabase to find the path of the active item and delete it.
- Lines 14-15 is purging the reference to the now deleted item from the ItemDatabase list and refreshing the ListView.
- Line 18 is hiding the details section since no item is selected now.
Test this out by selecting any of the items on the list and clicking delete. You should see the Item asset disappear from your data folder.
That’s it! You should now have a functional item manager for your game and the fundamentals to extend it for whatever you need.