Get started with Behavior Trees
Writing a good AI is challenging for many reasons. Not only do you need it to be believable but also easy to maintain. It can grow along side your game, getting more complex as each new feature is added. Behavior trees are an AI technique designed for just that! It is a modular AI framework that works great for more complex AI logic.
You will write an AI that will pick up all objects in the scene by navigating to random way points. At the end of this tutorial you will have fundamental knowledge of how a behavior tree works and will have created foundational nodes that can be reused in all your future projects.
Learning Outcomes
You will learn:
- What a Behavior Tree is.
- About the guiding principles of a Behavior Tree.
- The different types of nodes and their purposes.
- How to create the fundamental nodes using inheritance.
- How to drive the AI behavior within Unity.
Prerequisites
- Knowledge of C#.
- Unity 2020.1.0f1 should be installed.
- Download the starter project from the GitHub repository.
Resources
Getting started
There are many different techniques for creating artificial intelligence in a game. Popular ones are Finite State Machines, Fuzzy Logic and Behavior Trees. Some games use just one technique, while others will mix for a more dynamic feel.
Behavior Trees are a fantastic way to write modular AI that can scale in complexity. The tree is made up of various nodes that when put together, define of the behavior that will drive the AI. Think of the nodes as several lego blocks that are of different colors and the tree as the final masterpiece. You will reuse the different lego blocks (nodes) to build different masterpieces (trees).
Note: Nodes can also be referred to as Tasks or Leafs, depending on who is teaching. These mean the same thing.
Behavior Trees have two main guiding principles:
- Behaviors should be broken down to the smallest meaningful reusable component.
- Each behavior should be decoupled – that is to not depend directly on another behavior.
This tutorial will walk through creating a simple behavior tree from scratch. At the end, you will not only understand the core concepts behind a behavior tree, but you’ll have created reusable nodes that you can transfer into your game.
Download the project files
This tutorial has a starter scene and three scripts that will be used as a jumping off point. You can download the starter project by:
- Clone and/or download the GitHub repository.
- Navigate to the Get-started-with-behavior-trees\\projects\\starterProject folder in Unity.
You’ll see Materials, Prefabs, Scenes, and Scripts in Assets/WUG. Open the Demo scene in Assets/WUG/Scenes.
Install Behavior Tree Visualizer
Unity does not have a way to easily visualize how a tree is being drawn. This is especially useful when first learning and as trees get more complex. I have created an open source tool, Behavior Tree Visualizer, which this tutorial will use.
Behavior Tree Visualizer (BTV) will scan the scene for active behavior trees and group them in a drop down for easy toggle. Once selected, a graph will be drawn, and nodes will light up, showing you which part of the tree is currently running. You can also trigger the drawing of a specific graph through code – this gives you the ability to add a button to the inspector window, for example. You can read more about the features here.
You can install BTV through Package Manager:
- Go to Window > Package Manager.
- Click on the + button and choose Add Package from git URL.
- Enter the following URL: https://github.com/Yecats/UnityBehaviorTreeVisualizer.git?path=/com.wug.behaviortreevisualizer
Understanding Behavior Trees
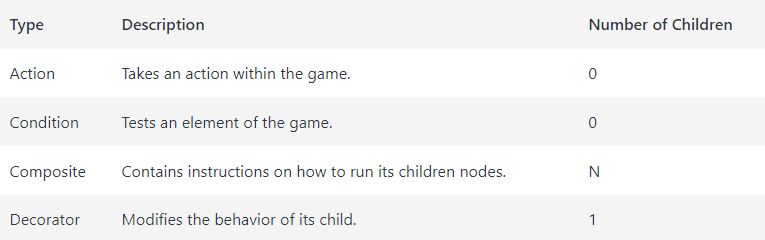
At its core, a Behavior Tree is a group of nodes. There are four categories of nodes, which all inherit from the same base class:
Each time a node runs, it has the possibility to return one of three status codes:
- Success: The node’s behavior has finished and ran as intended.
- Failure: The node’s behavior has finished and did not run as intended.
- Running: The node’s behavior is still executing.
Let us consider an example. You have an AI that needs to navigate through a locked door. Before they can, they would need a condition to check that they have the key to the door. If they do, they will need to take actions to unlock and open the door. All of this would be driven with a composite, likely a Sequence.
Note: We’ll explore standard composites in depth later. A Sequence is a composite you will use frequently. Its goal is to successfully run all its children. If any child returns a failure, it will stop running, no matter how many children are left, and return the status code of failure. If all children successfully run, it will return the status code of Success.
By using the Sequence composite, you ensure that if the condition, “Do they have the key?”, fails then the rest of the child nodes will not run. If it succeeds, the Sequence will run Unlock Door and Open Door.
We are missing a decorator in this example. Let us change it. Instead of wanting the AI to have the key, you want them to bash open the door if they do not have it. Since the “Do they have the key?” check needs to return success for the Sequence to continue, you’ll want to Invert the result with a decorator.
Note: An Inverter decorator is a very handy tool and simply flips the result. Nodes that would return success now return failure, and those that would return failure now return success. We will explore different decorator types later.
Here is what would happen when this branch runs:
- The Inverter will execute it’s child node, “Do they have the key?”.
- If the condition returns Success, the Inverter will flip the result to be a Failure. The Sequence will stop running and return Failure because one of its children failed.
- If the condition returns Failure, the Inverter will flip the result to be a Success. The Sequence will continue and run Bash Door.
Create the base node
The first thing that you will need is the base node that all of the other nodes will derive from.
- Add a new folder in Wug/Scripts/ called Behaviors.
- Create a new abstract C# script called Node and have it implement NodeBase.
Note: NodeBase is part of Behavior Tree Visualizer. It provides access to the NodeStatus enum which you will use for the return status codes. It also has other useful properties that you will use later.
You should now have this:
using WUG.BehaviorTreeVisualizer;

public abstract class Node : NodeBase { }
Node needs to have the ability to do two things – Run the logic and Reset the logic. There is a set of base things that will happen for every single node, which will occur in Run and Reset.
OnRun and OnReset will be overrode by each derived node and will contain the custom logic.
Add the following code to Node:
//Keeps track of the number of times the node has been evaluated in a single 'run'.
public int EvaluationCount;

// Runs the logic for the node
public virtual NodeStatus Run()
{
    //Runs the 'custom' logic
    NodeStatus nodeStatus = OnRun();

    //Increments the tracker for how many times the node has been evaluated this 'run'
    EvaluationCount++;

    // If the nodeStatus is not Running, then it is Success or Failure and can be Reset
    if (nodeStatus != NodeStatus.Running)
    {
        Reset();
    }

    //Return the StatusResult.
    return nodeStatus;
}

public void Reset()
{
    EvaluationCount = 0;
    OnReset();
}

protected abstract NodeStatus OnRun();
protected abstract void OnReset();
That is it for the base class! Now it is time to create some composites.
Create General Composites
Composites are guidelines for how branches (child nodes) should be run. A composite can have any number of children nodes. There are a handful of standard composites that you will use regularly. In this tutorial, you will create two types – the Sequence and the Selector.
Note: Behavior Tree Visualizer has several more composites in the Standard Nodes sample project. Go here for more details.
Both composites will inherit from a Composite class. Create a new abstract class in /WUG/Scripts/Behaviors called Composite, which will inherit from Node. Add the following code:
public abstract class Composite : Node
{
    protected int CurrentChildIndex = 0;

    //constructor
    protected Composite(string displayName, params Node[] childNodes)
    {
        Name = displayName;

        ChildNodes.AddRange(childNodes.ToList());
    }
}
This ensures that every Composite will take at least two parameters – a displayName and an array of childNodes.
CurrentChildIndex will be used to track the current child that the node is evaluating. This ensures you do not evaluate children that were already run.
Sequence
In the Understanding Behavior Trees section we touched a bit on a Sequence composite. Unlike the Selector, the goal of a Sequence is to run all its children. If any child fails to run (returns NodeStatus.Failure) then the whole Sequence will return NodeStatus.Failure.
Create a new class in /WUG/Scripts/Behaviors/Composites called Sequence, which will inherit from Composite. Add the following constructor and code for OnRun():
public Sequence(string displayName, params Node[] childNodes) : base(displayName, childNodes) { }

protected override NodeStatus OnRun()
{
    //Check the status of the last child
    NodeStatus childNodeStatus = (ChildNodes[CurrentChildIndex] as Node).Run();

    //Evaluate the current child node. If it's failed - sequence should fail.
    switch (childNodeStatus)
    {
        //Child failed - return failure
        case NodeStatus.Failure:
            return childNodeStatus;
        //It succeeded - move to the next child
        case NodeStatus.Success:
            CurrentChildIndex++;
            break;
    }

    //All children have run successfully - return success
    if (CurrentChildIndex >= ChildNodes.Count)
    {
        return NodeStatus.Success;
    }

    //The child was a success but we still have more to do - so call this method again.
    return childNodeStatus == NodeStatus.Success ? OnRun() : NodeStatus.Running;
}
OnRun() will iterate through a new child every time it is called and will evaluate the status of the child. There are three NodeStatus codes that the child node could return:
- NodeStatus.Success: The child node succeeded, so the sequence will iterate and move on to the next child.
- NodeStatus.Failure: The child node failed, so the sequence will fail as well, thereby returning NodeStatus.Failure.
- NodeStatus.Running: The child node is still running, so the sequence will continue to run it.
Once all children have successfully run, the Sequence will return NodeStatus.Success.
Finally, add the following code for OnReset():
protected override void OnReset()
{
    CurrentChildIndex = 0;

    for (int i = 0; i < ChildNodes.Count; i++)
    {
        (ChildNodes[i] as Node).Reset();
    }
}
OnReset() will iterate through each child and call their Reset()logic. It will also reset the index for CurrentChildIndex to 0, ensuring that it is setup properly for the next run.
Selector
The Selector’s goal is to run just one of its children Successfully. It will run each child in order until until one of them returns NodeStatus.Success. If all children return NodeStatus.Failure then it will also return NodeStatus.Failure.
Create a new class in /WUG/Scripts/Behaviors/Composites called Selector, which will inherit from Composite. Add the following constructor and code for OnRun():
public Selector(string displayName, params Node[] childNodes) : base(displayName, childNodes) { }

protected override NodeStatus OnRun()
{
    //We've reached the end of the ChildNodes and no one was successful
    if (CurrentChildIndex >= ChildNodes.Count)
    {
        return NodeStatus.Failure;
    }

    //Call the current child
    NodeStatus nodeStatus = (ChildNodes[CurrentChildIndex]as Node).Run();

    //Check the child's status - failure means try a new child, Success means done.
    switch (nodeStatus)
    {
        case NodeStatus.Failure:
            CurrentChildIndex++;
            break;
        case NodeStatus.Success:
            return NodeStatus.Success;
    }

    //If this point as been hit - then the current child is still running
    return NodeStatus.Running;
}
OnRun() will iterate through a new child every time it is called and will evaluate the status of the child. There are three NodeStatus codes that the child node could return:
NodeStatus.Success: The child node succeeded, so the Selector will be complete and return NodeStatus.Success.
NodeStatus.Failure: The child node failed, so the Selector will iterate and move on to the next child.
NodeStatus.Running: The child node is still running, so the Selector will continue to run it.
If all children have failed, the Selector will return NodeStatus.Failure, otherwise it will return NodeStatus.Running while it runs each child.
Finally, add the following code for OnReset():
protected override void OnReset()
{
    CurrentChildIndex = 0;

    for (int i = 0; i < ChildNodes.Count; i++)
    {
        (ChildNodes[i] as Node).Reset();
    }
}
Wrap-up
In this section you have learned about composites, which are a core functionality of behavior trees as they provide instructions on how to run their branch. Selector and Sequence are two common and useful composites, but they are not the only ones that you will likely need for your game. Here are three more types that could be useful:
- Parallel: Runs all the children at the same time. This is great if you want to trigger an animation while unlocking a door, for example.
- RandomSelector & RandomSequence: These would shuffle the children before iterating through them – giving more of a dynamic feel to the AI.
Note: Behavior Tree Visualizer has examples of these and more in the Standard Behavior Tree Nodes sample project. Go here for more details.
Create general decorators
Decorators are a way to alter the behavior of an instance of a class. Unlike a composite, a decorator only ever has one child. That child could be an action node, a condition node or even a composite itself.
Decorator Pattern is a design pattern in object-oriented programming. You can read more about it here.
There are many different decorators that are useful. This tutorial only needs two, the Inverter and the Timer.
Before we get started with each of these, we will need a Decorator class to inherit from. Create a new abstract class in /WUG/Scripts/Behaviors called Decorator, which will inherit from Node. Add the following code:
public abstract class Decorator : Node
{
    public Decorator(string displayName, Node node)
    {
        Name = displayName;
        ChildNodes.Add(node);
    }
}
The main difference between this and the Composite script, is that the Decorator will only accept a single child, rather than an array.
Inverter
In the Understanding Behavior Trees section we touched a bit on the Inverter decorator earlier in this tutorial. The concept behind it is simple, it will flip the result of its child node before passing it up the tree:
NodeStatus.Success will now be NodeStatus.Failure.
NodeStatus.Failurewill now be NodeStatus.Success.
- The Inverter will not do anything special if the child returns
NodeStatus.Running, as this means the child is still processing its logic.
Let’s get it added to the project:
- Add a new Decorators folder in /WUG/Scripts/Behaviors/.
- Create a new class in the Decorators folder called Inverter, which will inherit from
OnRun and OnReset methods:
public class Inverter : Decorator
    {
        public Inverter(string displayName, Node childNode) : base(displayName, childNode) { }

        protected override void OnReset() { }

        protected override NodeStatus OnRun()
        {

            //Confirm that a valid child node was passed in the constructor
            if (ChildNodes.Count == 0 || ChildNodes[0] == null)
            {
                return NodeStatus.Failure;
            }

            //Run the child node
            NodeStatus originalStatus = (ChildNodes[0] as Node).Run();

            // Check the status of the child node and invert if it is
            // Failure or Success
            switch (originalStatus)
            {
                case NodeStatus.Failure:
                    return NodeStatus.Success;
                case NodeStatus.Success:
                    return NodeStatus.Failure;
            }

            // Otherwise, it's still running or returning an Unknown code
            return originalStatus;

        }
    }
The OnRun() method will first confirm it has a valid child node. If it does, it’ll run it and check the status. If the child returned NodeStatus.Success or NodeStatus.Failure, the status will be flipped and returned otherwise it returns the original.
Timer
The goal of Timer is to continue to run the child node until the timer expires. The example below would cause the AI to make lock picks for two seconds. in the example below the AI must wait two seconds before making a lock pick and being able to pick the lock of the door.
Create a new class in the Decorators folder called Timer, which will inherit from Decorator. Add the following code for the global variables and constructor:
public class Timer : Decorator
{
    private float m_StartTime;
    private bool m_UseFixedTime;
    private float m_TimeToWait;

    public Timer(float timeToWait, Node childNode,  bool useFixedTime = false) :
        base($"Timer for {timeToWait}", childNode)
    {
        m_UseFixedTime = useFixedTime;
        m_TimeToWait = timeToWait;
    }
}
The constructor for Timer takes two new parameters:
- timeToWait: Amount of time to wait in seconds.
- useFixedTime: Whether to use Time.fixedTime (true) or Time.time (false).
Next, add the OnRun and OnReset methods:
protected override void OnReset() { }
protected override NodeStatus OnRun()
{
    //Confirm that a valid child node was passed in the constructor
    if (ChildNodes.Count == 0 || ChildNodes[0] == null)
    {
        return NodeStatus.Failure;
    }

    // Run the child node and calculate the elapsed
    NodeStatus originalStatus = (ChildNodes[0] as Node).Run();

    //If this is the first eval, then the start time needs to be set up.
    if (EvaluationCount == 0)
    {
        StatusReason = $"Starting timer for {m_TimeToWait}.
            Child node status is: {originalStatus}";
        m_StartTime = m_UseFixedTime ? Time.fixedTime : Time.time;
    }

    //Calculate how much time has passed
    float elapsedTime = Time.fixedTime - m_StartTime;

    //If more time has passed than we wanted, it's time to stop
    if (elapsedTime > m_TimeToWait)
    {
        StatusReason = $"Timer complete - Child node status is: { originalStatus}";
        return NodeStatus.Success;
    }

    //Otherwise, keep running
    StatusReason = $"Timer is {elapsedTime} out of {m_TimeToWait}.
        Child node status is: {originalStatus}";
    return NodeStatus.Running;

}
OnRun will setup the timer when the node runs for the first time. Each subsequent run will confirm that the timer has not expired. Every time OnRun is called, it will run the child node.
Wrap Up
In this section you learned about decorators and how they can be useful for changing the behavior of an instance of a node. There are many more decorators that can be particularly useful, such as:
- UntilFail: Continues to run the child node until the child returns a status of Failure.
- Repeater: Run the child node a specified amount of times before exiting.
- Delay: Executes a timer and then runs the child node once.
Behavior Tree Visualizer has examples of these and more in the Standard Behavior Tree Nodes sample project. Go here for more details.
A closer look at the demo project
Before you jump into making the game specific conditions and actions, we should go over what you will be creating. In a nutshell, you will tell an NPC character to navigate to a random waypoint and pick up all the items that are within 5 meters. This will continue until all items in the scene are picked up. The demo project that you downloaded came with a scene already setup and several scripts that the behavior tree will interact with.
The scene
Open the Demo scene, located under Assets/WUG/Scenes. There are three groups objects that are of interest in this scene:
- NPC is the character that will be driven by your behavior tree.
- Waypoints are five empty game objects spread across the scene.
- Items are 21 prefabs that have a box collider as a trigger and an Item script. These are all grouped around a waypoint.
The scripts
There are four scripts already included in this project:
- GameManager provides a top level view of the game by managing references to the NPC, Items and Waypoints. It has two helper methods that your behavior tree will use – GetClosestItem() and GetNextWayPoint().
- Item uses the OnTriggerEnter() method to pickup the item via GameManager.PickUpItem().
- GeneralExtensions contains a Shuffle() static helper method used by GameManager to randomize the waypoint list during Start.
- NonPlayerCharacter has a reference to the NavMeshAgent and the enum for tracking the NavigationActivity, which is either Waypoint or PickupItem.
The behavior tree
The behavior tree you will be writing may look complicated, but it is a simple one to traverse. Here is what you will be making:
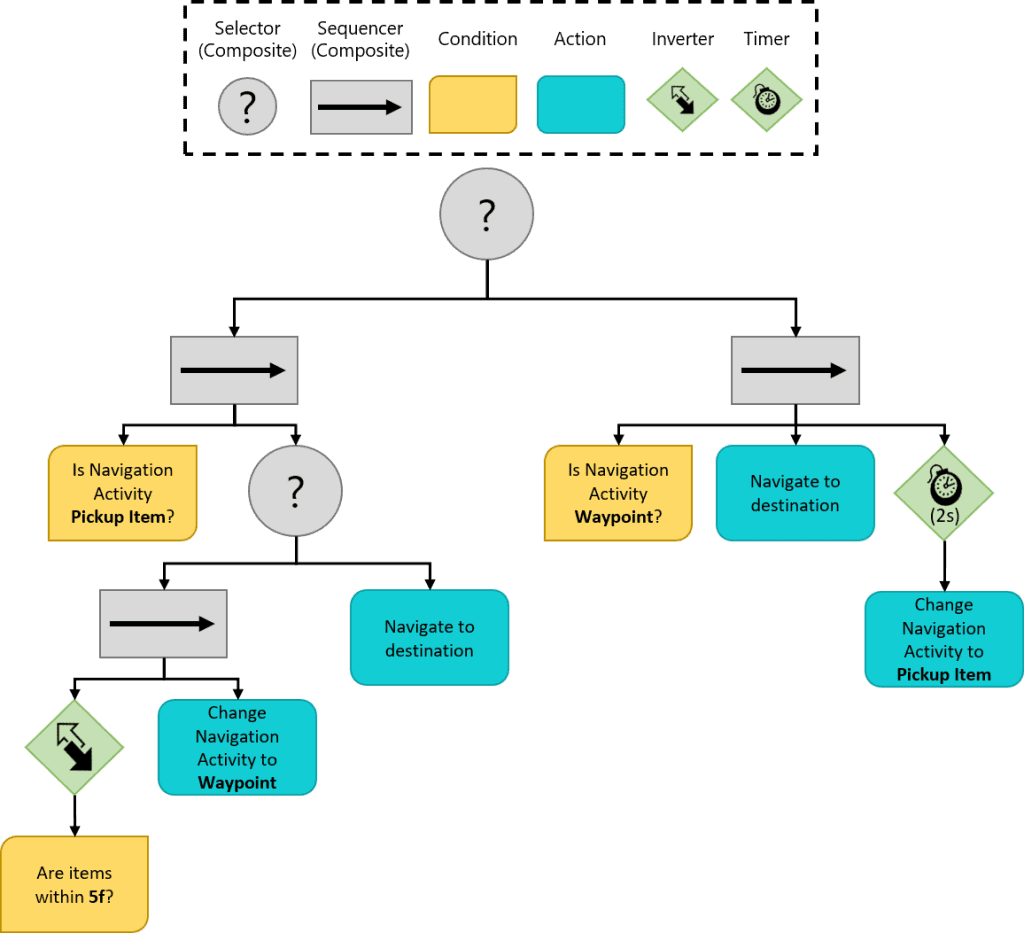
By having the first node as a Selector, we ensure that only one sequence (branch) will execute each run. Here is what each branch will do:
The left branch handles the logic for picking up all items within 5f of the waypoint. If there are no items, then the branch will set Navigation Activity to Waypoint. This will force the left branch to fail on the next condition check, which will ensure the right branch is evaluated. Here is an example of the evaluation for navigating the AI to the next item:
The right branch handles the logic for navigating to a waypoint. Once the AI arrives, it will use the timer decorator to pause for 2 seconds before changing the Navigation Activity from Waypoint to PickupItem. This switch will trigger the left branch to run the next time the tree is evaluated. Here is an example of the evaluation for moving the AI to the next waypoint:
Create custom conditions
Conditions can be thought of as the gate keeper for branches. A condition must be passed before the rest of the sibling nodes can be executed. Conditions are usually game specific, and I have yet to encounter a generic one. This demo project will have two conditions.
Like the other node types, you will need to create a Condition class to inherit from. Create a new abstract class in /WUG/Scripts/Behaviors called Condition, which will inherit from Node. Add the following code:
public abstract class Condition : Node
    {

        public Condition(string name)
        {
            Name = name;
        }

    }
There is nothing inherently special about this base class but having it will allow the Behavior Tree Visualizer to stylize all conditions a specific way. It also sets each condition up to easily have custom name set, as you will see shortly.
IsNavigationActivityTypeOf
The IsNavigationActivityTypeOf condition is quite simple – it will look at the NavigationActivity property on the NPC class and confirm that it is the desired value. If it is, it will return NodeStatus.Success and if not, it returns NodeStatus.Failure. It will take one property, which is the NavigationActivity to look for.
- Add a new Conditions folder in /WUG/Scripts/Behaviors/.
- Create a new class in the Conditions folder called IsNavigationActivityTypeOf, which will inherit from Condition.
- Add the following global variable and code for the constructor:
public class IsNavigationActivityTypeOf : Condition
{
    private NavigationActivity m_ActivityToCheckFor;

    public IsNavigationActivityTypeOf(NavigationActivity activity) :
        base($"Is Navigation Activity {activity}?")
    {
        m_ActivityToCheckFor = activity;
    }
}
The constructor will set the global variable m\_ActivityToCheckFor to the desired value to search for and pass a predefined Name to the base class. The name will be displayed on the node when using Behavior Tree Visualizer.
Add the following methods for OnReset() and OnRun():
protected override void OnReset() { }

protected override NodeStatus OnRun()
{
    if (GameManager.Instance == null || GameManager.Instance.NPC == null)
    {
        StatusReason = "GameManager and/or NPC is null";
        return NodeStatus.Failure;
    }

    StatusReason = $"NPC Activity is {m_ActivityToCheckFor}";

    return GameManager.Instance.NPC.MyActivity == m_ActivityToCheckFor ? NodeStatus.Success : NodeStatus.Failure;
}
OnRun() will first check for references to the necessary scripts and if those pass it’ll do a check against NPC.MyActivity for the value needed.
AreItemsNearBy
The AreItemsNearBy condition will check to see if an item is a specific distance from the player. It will take one property, which is the maxDistance to search. Create a new class in the Conditions folder called AreItemsNearBy, which will inherit from Condition. Add the following global variable and code for the constructor:
public class AreItemsNearBy : Condition
{
    private float m_DistanceToCheck;

    public AreItemsNearBy(float maxDistance) : base($"Are Items within {maxDistance}f?")
    {
        m_DistanceToCheck = maxDistance;
    }
}
Add the following methods for OnReset() and OnRun():
protected override void OnReset() { }

protected override NodeStatus OnRun()
{
    //Check for references
    if (GameManager.Instance == null || GameManager.Instance.NPC == null)
    {
        StatusReason = "GameManager and/or NPC is null";
        return NodeStatus.Failure;
    }

    //Get the closest item
    GameObject item = GameManager.Instance.GetClosestItem();

    //Check to see if something is close by
    if (item == null)
    {
        StatusReason = "No items near by";
        return NodeStatus.Failure;

    }
    else if (Vector3.Distance(item.transform.position,
        GameManager.Instance.NPC.transform.position) > m_DistanceToCheck)
    {
        StatusReason = $"No items within range of {m_DistanceToCheck} meters";
        return NodeStatus.Failure;
    }

    return NodeStatus.Success;
}
OnRun() will do the same instance check and if it passes, will call GameManager.GetClosestItem for the next item. If that item is null or not within the range of m\_DistanceToCheck then the condition will return NodeStatus.Failure. Otherwise, it will return NodeStatus.Success
Create custom actions
Actions are the meat of your behavior tree. They are usually either changing functionality behind the scenes and/or are what drive the visual changes of your AI. This demo project will have two actions. One will change functionality behind the scenes and the other will be what moves the AI to a new location. Unlike all the other node types you have created, actions will inherit directly from Node so there is no extra base class to create.
SetNavigationActivityTo
By now you have probably noticed that NavigationActivity is the gate keeper to each of the branches. Your tree will need a way to change that value, which is the purpose of the SetNavigationActivityTo class.
Add a new Actions folder in /WUG/Scripts/Behaviors/.
- Create a new class in the Actions folder called SetNavigationActivityTo, which will inherit from Node.
- Add the following code:
public class SetNavigationActivityTo : Node
{

    private NavigationActivity m_NewActivity;

    public SetNavigationActivityTo(NavigationActivity newActivity)
    {
        m_NewActivity = newActivity;
        Name = $"Set NavigationActivity to {m_NewActivity}";
    }
    protected override void OnReset() { }

    protected override NodeStatus OnRun()
    {
        if (GameManager.Instance == null || GameManager.Instance.NPC == null)
        {
            StatusReason = "GameManager and/or NPC is null";
            return NodeStatus.Failure;
        }

        GameManager.Instance.NPC.MyActivity = m_NewActivity;

        return NodeStatus.Success;
    }
}
The constructor will take a new parameter of type NavigationActivity and set the private global variable to that value. OnRun() will make sure it has a reference to the necessary instances and if so, set the value and return NodeStatus.Success. NodeStatus.Failure will be returned if the node it lacks the necessary references.
NavigateToDestination
NavigateToDestination will set and monitor the movement of the AI to a new destination via the NavMeshAgent. Create a new class in the Actions folder called NavigateToDestination, and have it inherit from Node. Add the following code:
public class NavigateToDestination : Node
{
    private Vector3 m_TargetDestination;

    public NavigateToDestination()
    {
        Name = "Navigate";
    }

    protected override void OnReset() { }
}
Notice that the constructor in this case is only setting the Name variable. This is because OnRun() will communicate with GameManager to obtain the destination. Go ahead and add the code for OnRun():
protected override NodeStatus OnRun()
{
    //Confirm all references exist
    if (GameManager.Instance == null || GameManager.Instance.NPC == null)
    {
        StatusReason = "GameManager or NPC is null";
        return NodeStatus.Failure;
    }

    //Perform logic that should only run once
    if (EvaluationCount == 0)
    {
        //Get destination from Game Manager
        GameObject destinationGO = GameManager.Instance.NPC.MyActivity ==
            NavigationActivity.PickupItem ?  GameManager.Instance.GetClosestItem()
            : GameManager.Instance.GetNextWayPoint();

        //Confirm that the destination is valid - If not, fail.
        if (destinationGO == null)
        {
            StatusReason = $"Unable to find game object for {GameManager.Instance.NPC.MyActivity}";
            return NodeStatus.Failure;
        }

        //Get a valid location on the NavMesh that's near the target destination
        NavMesh.SamplePosition(destinationGO.transform.position, out NavMeshHit hit, 1f, 1);

        //Set the location for checks later
        m_TargetDestination = hit.position;

        //Set the destination on the NavMesh. This tells the AI to start moving to the new location.
        GameManager.Instance.NPC.MyNavMesh.SetDestination(m_TargetDestination);
        StatusReason = $"Starting to navigate to {destinationGO.transform.position}";

        //Return running, as we want to continue to have this node evaluate
        return NodeStatus.Running;
    }

    //Calculate how far the AI is from the destination
    float distanceToTarget = Vector3.Distance(m_TargetDestination, GameManager.Instance.NPC.transform.position);

    //If the AI is within .25f then navigation will be considered a success
    if (distanceToTarget < .25f)
    {
        StatusReason = $"Navigation ended. " +
            $"\n - Evaluation Count: {EvaluationCount}. " +
            $"\n - Target Destination: {m_TargetDestination}" +
            $"\n - Distance to target: {Math.Round(distanceToTarget, 1)}";

        return NodeStatus.Success;
    }

    //Otherwise, the AI is still on the move
    StatusReason = $"Distance to target: {distanceToTarget}";
    return NodeStatus.Running;

}
There is a lot to unpack here! Let us break down the code.
When the node is first run, it will ask the GameManager for a target destination depending on what the current NavigationActivity of the NPC is. The GameManager will either return the closest item position or the next way point position. Once there is a position, the node will use NavMesh.SamplePosition to get a position that the NavMeshAgent can navigate to. This will help prevent passing a value to the NavMesh that it is unable to calculate a navigation path to. Finally, the node will return NodeStatus.Running. This makes sure that the behavior tree will do another evaluation.
On all subsequent evaluations, the node will calculate the distance between the NPC and the destination. If the NPC has more than 0.25f distance, the node will return NodeStatus.Running. Otherwise, the navigation will be considered a complete and the node will return NodeStatus.Success.
Note: This tutorial does not cover the NavMesh system in depth. See the Unity Manual for more information on how the NavMesh works. If you are wondering what is causing the AI to actually move, it’s triggered when NavMeshAgent.SetDestination is set.
It should be noted that this node is rudimentary. It is missing some failsafe checks, such as whether the NavMeshAgent got stuck, the path failed to recalculate or more.
Building and running the Tree
Finally! The time has come to put the tree together and see the AI in action. You will use a coroutine to run the behavior tree, which also lets you control how often you evaluate the nodes through the WaitForSeconds YieldInstruction.
Note: This tutorial does not cover coroutines in depth. They are very handy and worth reading on if you are not familiar. See the Unity Manual for more information.
Build
The first thing that you will do is build the tree. Open the NonPlayerCharacter script, located in the Assets/WUG/Scripts folder.
Behavior Tree Visualizer requires the use of IBehaviorTree to read runtime trees. Implement IBehaviorTree by changing this line:
public class NonPlayerCharacter : MonoBehaviourto:
public class NonPlayerCharacter : MonoBehaviour, IBehaviorTreeIBehaviorTree sets the contract of using a property to store your behavior tree. Add the following global variable and new method:
public NodeBase BehaviorTree { get; set; }

private void GenerateBehaviorTree()
{
    BehaviorTree =
        new Selector("Control NPC",
            new Sequence("Pickup Item",
                new IsNavigationActivityTypeOf(NavigationActivity.PickupItem),
                new Selector("Look for or move to items",
                    new Sequence("Look for items",
                        new Inverter("Inverter",
                            new AreItemsNearBy(5f)),
                            new SetNavigationActivityTo(NavigationActivity.Waypoint)),
                    new Sequence("Navigate to Item",
                        new NavigateToDestination()))),
                    new Sequence("Move to Waypoint",
                        new IsNavigationActivityTypeOf(NavigationActivity.Waypoint),
                        new NavigateToDestination(),
                        new Timer(2f,
                            new SetNavigationActivityTo(NavigationActivity.PickupItem))));
}
GenerateBehaviorTree() is a bit messy to read and as I am sure you can imagine, the larger a tree gets the more difficult it becomes. In a nutshell, the code is creating the same structure that was in the diagram:
Tip: Use indenting to help keep track of the current level of your behavior tree. The Behavior Tree Visualizer is a good way to pinpoint any mistakes in nesting at runtime.
The last thing to do is add the coroutine logic. Add two more global variables:
private Coroutine m_BehaviorTreeRoutine;
private YieldInstruction m_WaitTime = new WaitForSeconds(.1f);
Add two more methods – RunBehaviorTree() and Unity’s OnDestroy():
private IEnumerator RunBehaviorTree()
{
    while (enabled)
    {
        if (BehaviorTree == null)
        {
            $"{this.GetType().Name} is missing Behavior Tree.
                Did you set the BehaviorTree property?".BTDebugLog();
            continue;
        }

        (BehaviorTree as Node).Run();

        yield return m_WaitTime;
    }
}

private void OnDestroy()
{
    if (m_BehaviorTreeRoutine != null)
    {
        StopCoroutine(m_BehaviorTreeRoutine);
    }
}
RunBehaviorTree() will first make sure that the BehaviorTree property is not null. If it is not, it will call Run() on the top level node. This will trigger the evaluation down the tree. You will use the Behavior Tree Visualizer to see how it is running shortly. The last thing you need to do is update Start to create the tree and start the coroutine:
private void Start()
{
    MyNavMesh = GetComponent<NavMeshAgent>();
    MyActivity = NavigationActivity.Waypoint;

    GenerateBehaviorTree();

    if (m_BehaviorTreeRoutine == null && BehaviorTree != null)
    {
        m_BehaviorTreeRoutine = StartCoroutine(RunBehaviorTree());
    }
}
Setup Behavior Tree Visualizer
Behavior Tree Visualizer (BVT) is designed to scan the scene for active behavior trees and will group all of them into a toggle for drop down. You have been integrating with the tool throughout this tutorial. There are only two more steps left and you will have a working representation of your tree.
The first thing you need to do is update the Node script to notify BVT when the NodeStatus or StatusReason has changed. Open the Node script.
Add a new global variable:
private string m_LastStatusReason { get; set; } = "";You will need a new if statement between NodeStatus nodeStatus = OnRun(); and EvaluationCount++;. Your OnRun method should now look like:
public virtual NodeStatus Run()
{
    NodeStatus nodeStatus = OnRun();

    if (LastNodeStatus != nodeStatus || !m_LastStatusReason.Equals(StatusReason))
    {
        LastNodeStatus = nodeStatus;
        m_LastStatusReason = StatusReason;
        OnNodeStatusChanged(this);
    }

    EvaluationCount++;

    if (nodeStatus != NodeStatus.Running)
    {
        Reset();
    }

    return nodeStatus;
}
Next, you need to set the style of your nodes. This includes the highlight border, the title bar color, and icons. The package comes with several icons for styling. Click on What Up Games > Behavior Tree Visualizer > Settings.
Before configuring the settings, it is useful to understand the order of operations that BVT performs when deciding how a node should be styled:
- First, each node is checked against the Override Styles section.
- If no Override exists, the node is checked against the Main Node Styles section to see if the derived type exists.
- Finally, if the Main Node Styles check fails, it is stylized with the settings in Default Style
Note: Behavior Tree Visualizer has several useful settings that are all documented on the Wiki. You can read more here.
Here are the settings that I use:

See it in action
That is it! It is now time to see your AI move around and watch the tree. Here is how you can see your tree in action:
- Open Behavior Tree Visualizer via What Up Games > Behavior Tree Visualizer.
- Push Play in Unity.
- Once the AI starts moving, click Scan Scene in BVT.
- Click the Select Behavior Tree drop down and select NPC.
It is possible to add a button to the Inspector window of the NPC to launch BVT that way. See “Add a ‘Draw Behavior Tree’ Button to the Inspector” for more details.
You should now see your AI pick up items and a visual graph showing you which part of the behavior tree is currently running.