Stream content from a remote catalog with Addressables
Having the ability to load content into a game without forcing the user to download an update is critical to keeping players engaged. There are a lot of different use cases for this. You might want to swap out some models and textures so that they match the holiday season. Or, you can also use this technique to reduce the initial download time of your game by packaging only a couple of levels and assets. Then you can rely on Addressables and a CDN to download the remaining game behind the scenes while they are playing.
In this tutorial, you’ll expand on your Addressables knowledge from part 1 of this series and learn how to read from a remote catalog hosted on Unity’s Cloud Content Delivery (CCD) service.
Note: As of the writing of this tutorial, CCD has a great free tier. It provides 50 GB of bandwidth usage a month. You will be able to use the knowledge you gain if you prefer to use a different service. If using CCD, please be sure to confirm that the offering has not changed.
Learning Outcomes
The first part of this series, Load, unload and change assets at runtime with Addressables, covered the benefits of the system, terminology, structure, how to instantiate/destroy a prefab and change a material.
In this part of the series, you will learn how to:
- Configure Addressables to build for and load from a remote catalog.
- How to configure Addressables to work with multiple platforms.
- Understand the concepts of Cloud Content Delivery (CCD) and how to set up buckets/releases.
- Upload your addressable assets to Cloud Content Delivery.
- How to switch the assets that are streamed into your game on launch.
Prerequisites
Note: This tutorial was created with 2020.3 LTS but should still work with 2019 LTS.
- Basic knowledge of Addressables and/or completion of Load, unload and change assets at runtime with Addressables.
- You will need Unity 2020.3 LTS or later to follow along.
- This tutorial assumes you already have basic knowledge of Unity and intermediate knowledge of C#.
Resources
Create a Unity service Project ID
To use any of Unity’s services, you need to have a Project ID. You can generate a Project ID on the Unity Dashboard:
- Navigate to Unity Dashboard and log in with the same account you use in the Hub.
- Click on Create Project in the top right corner.
- Name the project wug-addressables-demo and click the Create Project button.
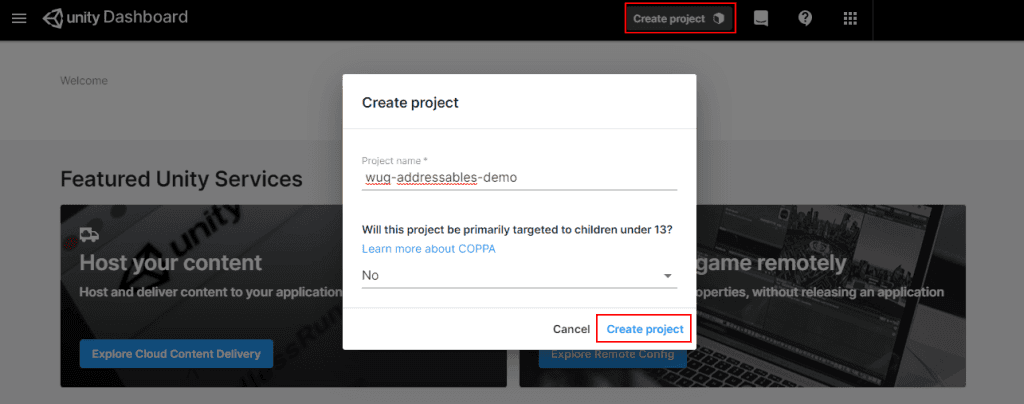
Click the Create Project button to get started
Some services will require your local project to be associated with the Project ID. However, this is not necessary for Cloud Content Delivery.
Once created, you’ll be taken to a list of all of your projects. You will need to use the Project ID later, so it’s best to grab the GUID now. Do the following to find it:
- Click on the wug-addressables-demo project on the list.
- Copy the GUID next to the Project ID section.
You can find the Project ID at any point by going to Settings \> Project Settings and selecting the project from the list.
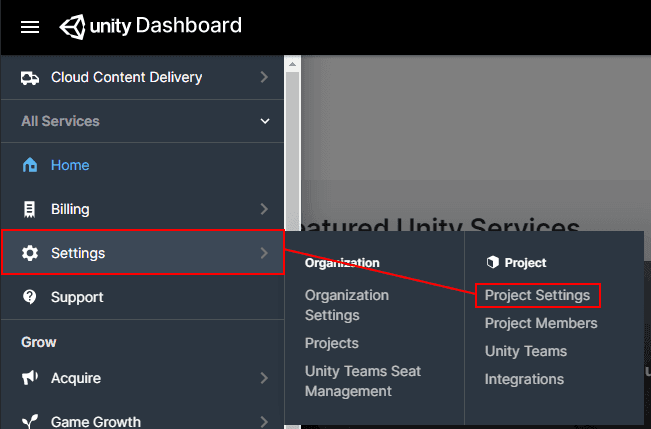
The Project ID can be found at any time under Project Settings
Enable Cloud Content Delivery
Cloud Content Delivery is a service that hosts and delivers content to a game/application without requiring players to install a new version. To get started, you will need to sign up for the service:
- On the Unity Dashboard, look for the Cloud Content Delivery service and click Explore.
- Select the Start a Free Trial button on the top of the page and follow the instructions for signing up.
Once signed up, go back to the dashboard and navigate to CCD again. There are four items in the left navigation:
- Overview: Gives you a view of total usage across your entire organization by grouping all projects together.
- Projects: Displays a list of all projects associated with the organization. This is where you go to configure the service for a specific project.
- API Key: Quick access to your API key, which will give you access to content.
- Download CLI: Provides links to download the CLI. The command-line interface, or CLI, is one of the ways to upload your addressable content to the service.
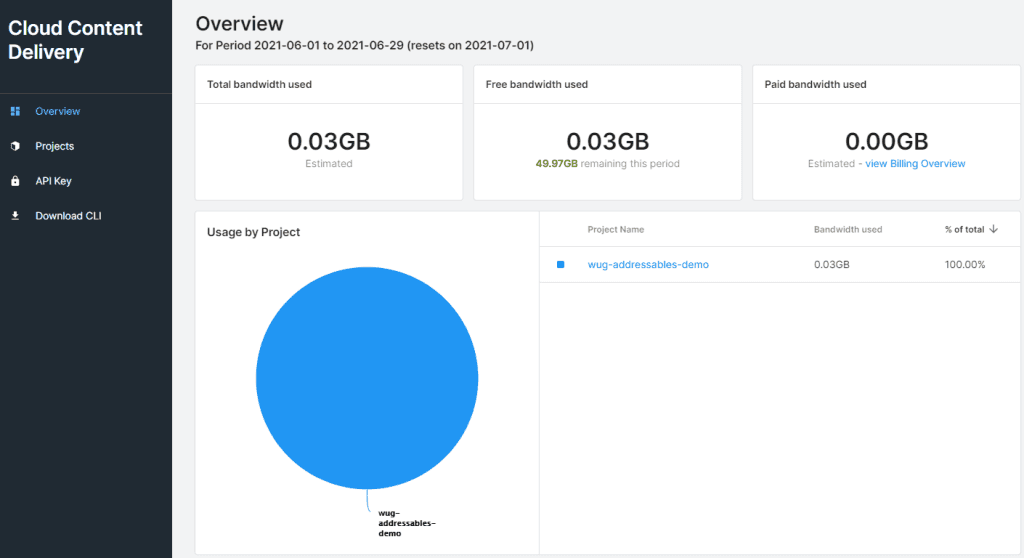
An example of the Overview screen
There are four concepts that are important to know when using CCD:
- Bucket: An arbitrary container you use to organize your content.
- Entry: A single unit of content within a bucket. In other words, if you uploaded four files then you would have four entries.
- Release: A snapshot of the current state of all content (entries) in a bucket.
- Badge: A way to specify the release your game should load.
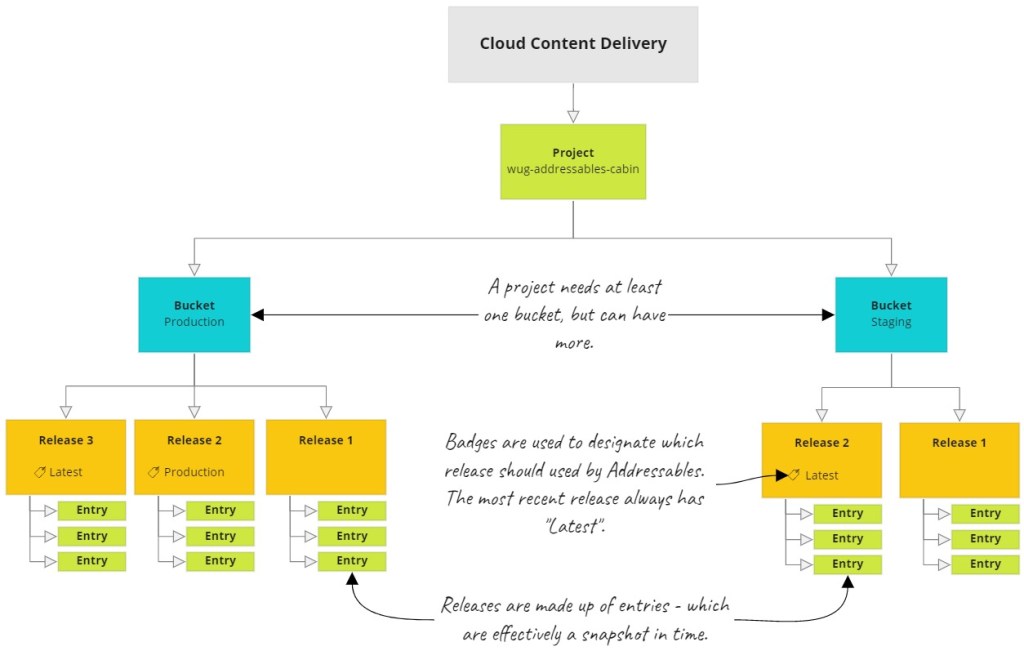
In the example above, Cloud Content Delivery has one project that has two buckets – Production and Staging. The Production bucket has three releases, each with three entries. Release #3 has the Latest badge, which was automatically set by Cloud Content Delivery because it is the latest release. Release #2 has the Production badge, which was set manually because CCD will not move custom badges on it’s own.
Create a bucket in CCD
A bucket is an arbitrary container you use to organize your content. How your content is organized is up to you. You could do it by platform (mobile, Console and PC), environment (staging and production), or any other structure.
This tutorial will keep things simple by having one bucket named Windows that will use a custom Production badge to designate the content that should be streamed to the game. Here is how you can create a new bucket:
- In CCD, navigate to the Projects tab and pick wug-addressables-demo on the list.
- Click on the Create Bucket button and name it Windows.
- Click Submit.
Buckets have a ID associated with them which is located under the bucket name. Copy the ID since you will need to use it shortly.
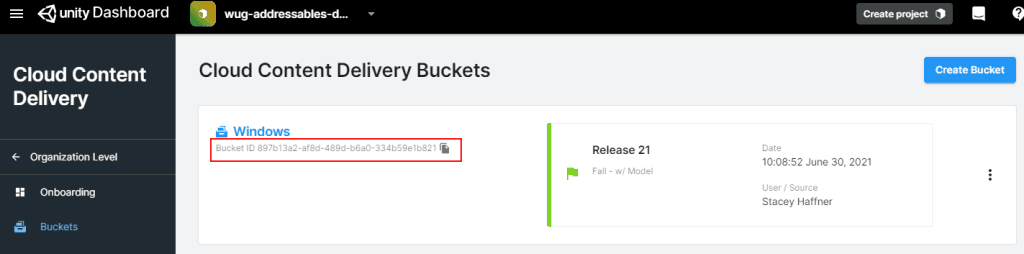
Example of where the Bucket ID is located
Configure Addressables
Alright, that’s all that you can do with CCD for now as the remaining steps can’t be done until content is uploaded for the first time. This means that it is time to configure Addressables!
Setup the Addressable Profiles
Profiles are a way to have multiple configurations that define how Addressables should handle building and loading the addressable catalog. A profile is simply a set of string variables that you can reference in various places.
You will need to setup a new Production profile:
- Go to Window \> Asset Management > Addressables \> Profiles.
- Click on Create > New Profile and name it Production.
- Right click on Production and select Set Active.
Note: Instead of creating a new profile, you could update the Default one. Personally, I like to keep it around for reference.
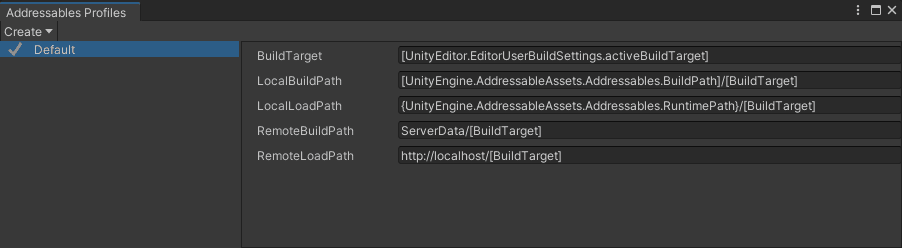
Each profile comes with five default variables. You can change, add or remove variables if needed. Here’s a quick overview of what you get by default:
- BuildTarget: A quick reference to the current build target of the project.
- LocalBuildPath and RemoteBuildPath: The locations that content will be saved to when a Addressables build is triggered.
- LocalLoadPath and RemoteBuildPath: Paths that Addressables will call to load content at runtime.
The RemoteLoadPath is the only variable that needs to be changed in the Production profile because it needs to point to an endpoint hosted by CCD. The structure of the URL for CCD is as follows:
https://{PROJECT ID}.client-api.unity3dusercontent.com/client\_api/v1/buckets/{BUCKET ID}/release\_by\_badge/{BADGE}/entry\_by\_path/content/?path=
Note: If you are using Cloud Build to automatically deploy then the URL will be slightly different as Cloud Build uploads content into a sub folder.
You will need to format this URL to work with a Production badge, which you will create in CCD later. Format a new URL by changing the following three parameters, making sure to remove the curly braces that surround each:
- Project ID: Located on the Unity Dashboard under Settings > Projects.
- Bucket ID: Located on the Cloud Content Delivery Dashboard under Projects > wug-addressables-demo > Buckets.
- Badge: Set this to Production.
For example, if my project id was eca232ac-6ec8-46d6-af8a-9ff0712364fb and my bucket ID was dfd7a7ae-e749-45b8-8ab6-8e04b9a8b8f4, the URL I would use would be:
https://eca232ac-6ec8-46d6-af8a-9ff0712364fb.client-api.unity3dusercontent.com/client\_api/v1/buckets/dfd7a7ae-e749-45b8-8ab6-8e04b9a8b8f4/release\_by\_badge/Production/entry\_by\_path/content/?path=
Set the RemoteLoadPath on the Production profile to your newly generated URL.

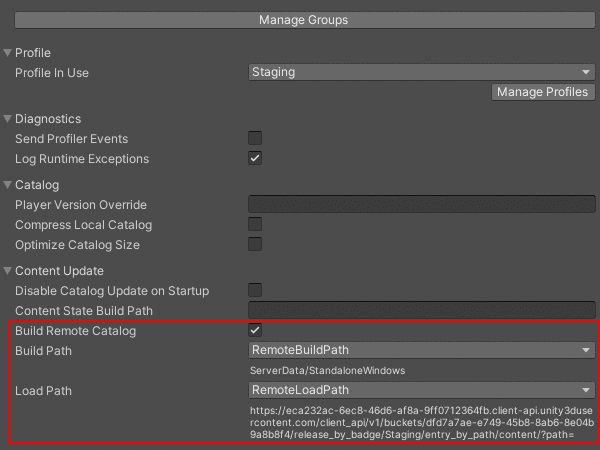
Update the Addressable Settings
By default, Addressables is setup to look the LocalBuildPath and LocalLoadPath variables. However, you will need to update this to point to the two remote variables:
- Go to Window \> Asset Management > Addressables \> Settings.
- Check the Build Remote Catalog box, located under the Content Update section.
- Change Build Path to point to RemoteBuildPath.
- Change Load Path to point to RemoteLoadPath.
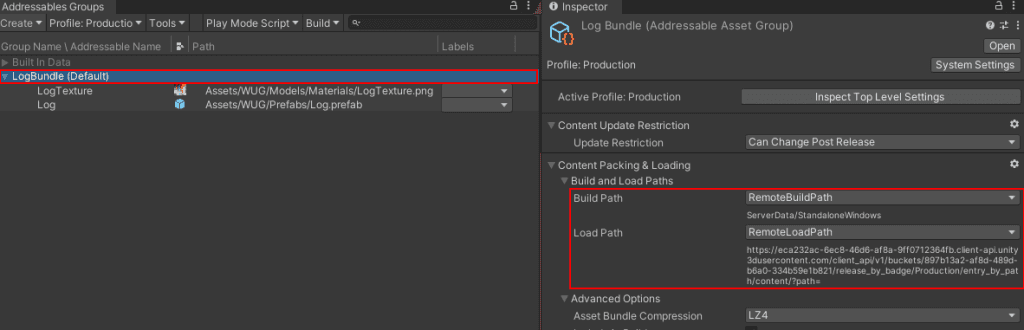
You can configure some bundles to be included in your game by default and some to be delivered later by CCD by altering the paths on a per group basis. For this project, you will only have a single bundle which will be delivered by CCD. This means that you will need to fix the build path and load path for the LogBundle group:
- Go to Window \> Asset Management > Addressables > Groups.
- Select the LogBundle (Default) header to pull up the settings in the Inspector window.
- Change Build Path and Load Path to point to the remote variables. You can find them under Content Packing & Loading > Build and Load Paths.
Build your Addressable Content
Doing a build action with Addressables will build the asset bundles and a catalog. As a reminder, the catalog is the data store that is used to look up an asset’s physical location via the address. You will need to build it once and before you produce a local or remote build of your project. This is done through the Addressables Groups window:
- Click on the Build drop down and select New Build > Default Build Script.
You will need to make sure to update the Addressables build any time you change settings or update a group by going to Build \> Update a Previous Build. However, you can create a build script to streamline this workflow – read more here.
Your content will be built based on the RemoteBuildPath variable, which by default is the ServerData/{BuildTarget} folder in your project’s root directory.
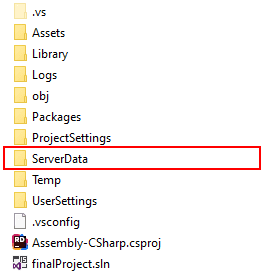
My project directory, which shows the newly created ServerData folder
Release your Addressable content
An entry is a single unit of content within a bucket. In other words, when you upload a file to CCD you are creating a new entry. It’s time to upload your newly built addressables content to CCD:
- Go back to the CCD Dashboard and navigate to the Windows bucket in Cloud Content Delivery.
- Click on the Upload using the dashboard dropdown.
- Drag and drop all of the files in the ServerData/BuildTarget directory. _(e.g. ServerData/Standalone windows.)_
- Click the Upload Files button.
- Once completed, push the Refresh Page button or refresh your browser.
You should now see a list of entries. These entries are not yet released, which means Addresssables will not be able to access them. As a reminder, a release is a snapshot of the current state of all content (entries) in a bucket. Creating a release is simple:
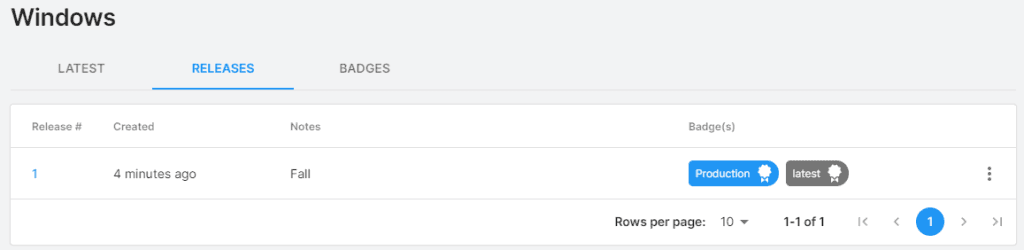
- Click on the Create Release button at the top.
- Put “Fall” in the release notes. (This will help later.)
- Continue to hit the Next button until you see the Confirm screen and push Submit.
Create the badges
Badges are you how you control what content gets streamed to your game. By default, CCD includes a “Latest” badge which it will automatically assign to the latest release. I’m not a fan of using the latest badge, because you can’t control what content is assigned to it.
For example, consider a scenario where you release new content and realize there’s a bug and want to roll back. If you are using the automatically generated “Latest” badge, you could not roll back. Instead, you would need to upload new entries with the older content and create a new release.
Here’s how you create a new badge:
- Click on the Badges tab.
- Click Add New in the top right corner.
- Name the badge Production.
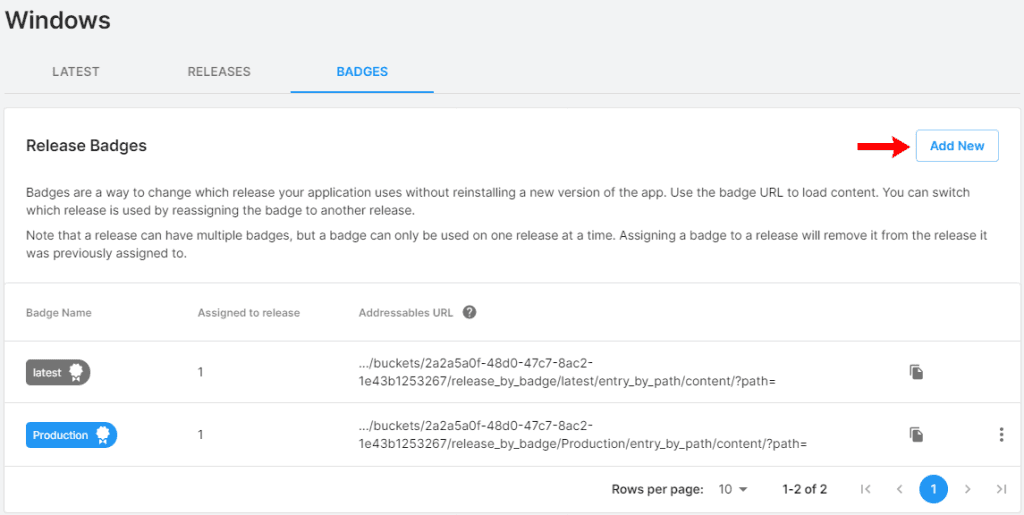
Once created, the badge should default to the latest release. Click on the Releases tab to make sure it was properly assigned. If not, you can easily change the badge by clicking the three dots next to the release and selecting Assign Badges.
Change the Play Mode Script
You will need to set the Play Mode Script to Use Existing Build if you want to test using your remote catalog in the editor. This can be found on menu bar of the Addressable Groups window.
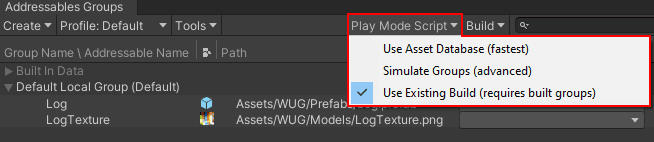
Here’s what the three options do:
- Use Asset Database: Uses the asset database and does not do any analysis or asset bundle creation. This is the default option.
- Simulate Groups: Analyzes the content for layout and dependencies without creating the asset bundles. Assets are still loaded from the Asset database.
- Use Existing Build: Uses a built catalog instead of the asset database. Use this option to more closely simulate an actual build of your game.
Press play and you should see everything working just the same as when you used the local catalog.
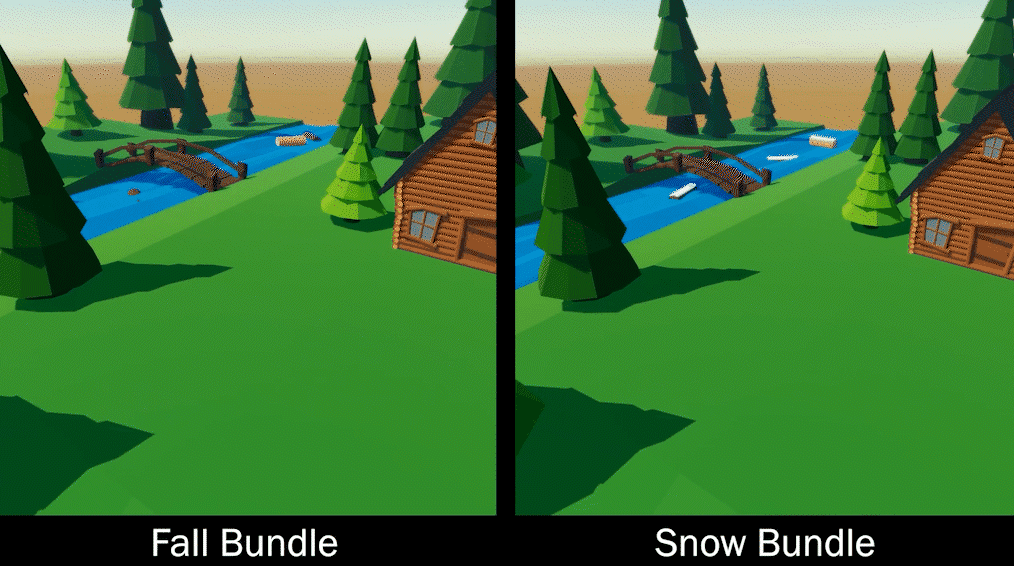
Test Scenario: Swapping the log model
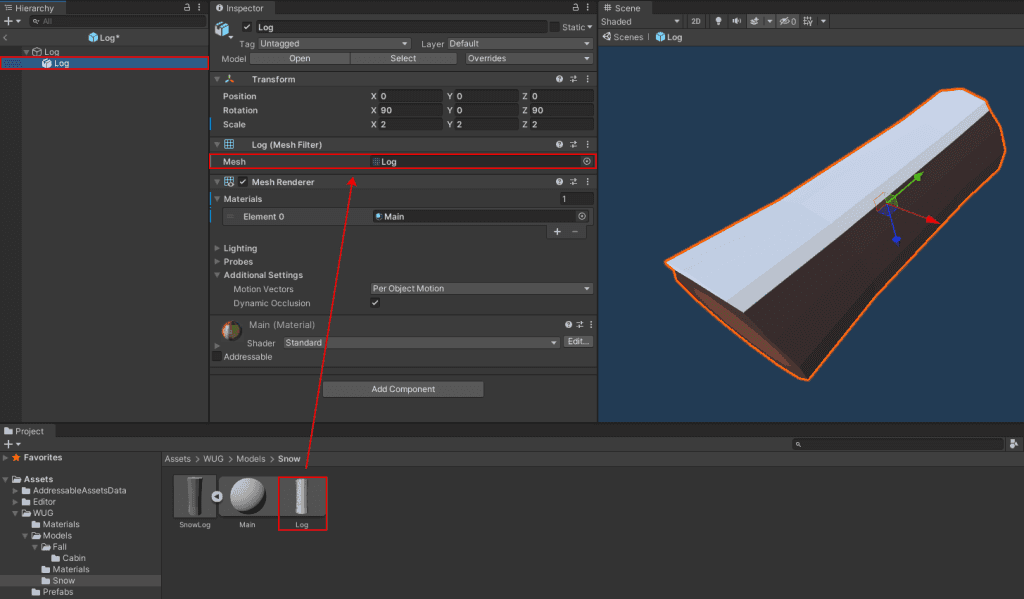
You can make sure that this is really working by uploading new content to CCD. The prefab that is bundled is pointing to a fall log model. Instead you will have it point to a snow log:
- Download this snow log model and import it into your project.
- Open the Log Prefab and change the Mesh from the Fall log mesh to the Snow log mesh.
You should see the model change to have a white bit of snow on the top. Exist prefab edit mode and make sure to save your changes.
It is important that you update your previous addressables build instead of creating a new one. This is because every time you do the Build \> New Build action, it will generate a new unique “app content version” string. Addressables will use the app content version to determine which content catalog should be loaded. The value must match between the catalog on your remote server and the local version generated with your project.
Note: You can read more about the content update workflow here.
Before getting started, navigate back to your ServerData/BuildTarget folder and delete all of your previously built files. This will make sure you are uploading the latest content.
Next, update your existing build:
- Window \> Asset Management > Addressables \> Groups.
- Click on Build \> Update a Previous Build.
- Navigate to the addressables\_content\_state.bin file located under your build target. In my case, I can find it under Assets > AddressableAssets Data > Windows.
- Select addressables\_content\_state.bin and click on Open.
You should now see a new set of files with the same catalog name as your original one in your ServerData/BuildTarget folder.
Upload the new files to Cloud Content Delivery
Head back over to your Bucket in the Cloud Content Delivery dashboard to upload the new assets:
- Under the Entries section is a Upload Content tab. Click on that tab to drag/drop all of your newly built assets.
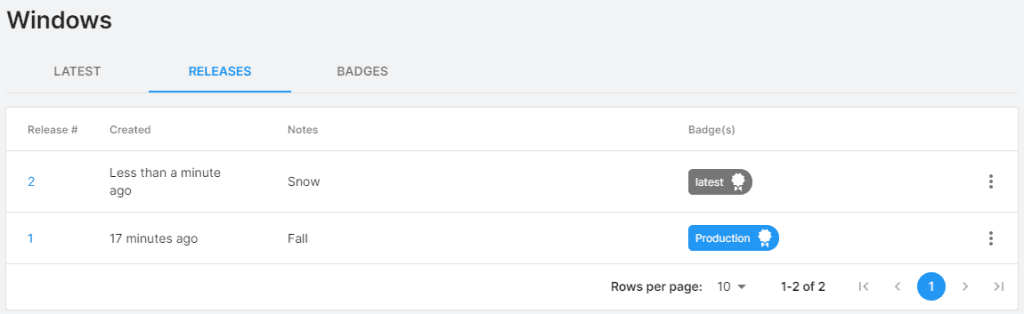
- Click the Upload 4 Files button to complete the upload. Once done, refresh the page. You will now have a set of unreleased entries.
- Click the Create Release button to start the release process. In the release notes section, put “Snow”. Do not assign the Production badge.
You should now have two releases with the Production badge assigned to the Fall release.
Test your build
Testing is very easy since you are using a custom badge. It is important to note that CCD and Addressables can take up to five minutes to detect that there’s a different set of data that it needs to stream in. For example, when you move the Production badge to snow it can take a bit of time for your game to detect that change. However, I find that this usually only takes under a minute.
Here are the steps for testing that content is properly streaming in.
Streaming fall logs
- In CCD, navigate to the Releases tab of your bucket to verify that the Fall release has Production badge. If it does not, then click the three dots and choose Assign Badges.
- In Unity, press play. Remember to wait a bit of time if you just changed the badge.
You should see the fall logs being instantiated.
Streaming snow logs
- In CCD, navigate to the Releases tab of your bucket.
- Click the three dots next to your Snow release, choose Assign Badges and select the Production badge.
- Wait ~30 seconds to 1 minute and press play in Unity.
You should see the snow logs being instantiated.
One more tip: You can tell Addressables to write more verbose log messages to the console by adding ADDRESSABLES_LOG_ALL to your Scripting Define Symbols. Scripting Define Symbols can be found under Edit \> Project Settings \> Player \> Other Settings. This is very helpful for debugging.